The first step in the club repair process is entering the order in the "Repairs Entered" stage (as shown below).
In this article, we will discuss the process for entering club repairs.
Entering Club Repairs
To enter a club repair, follow these instructions:
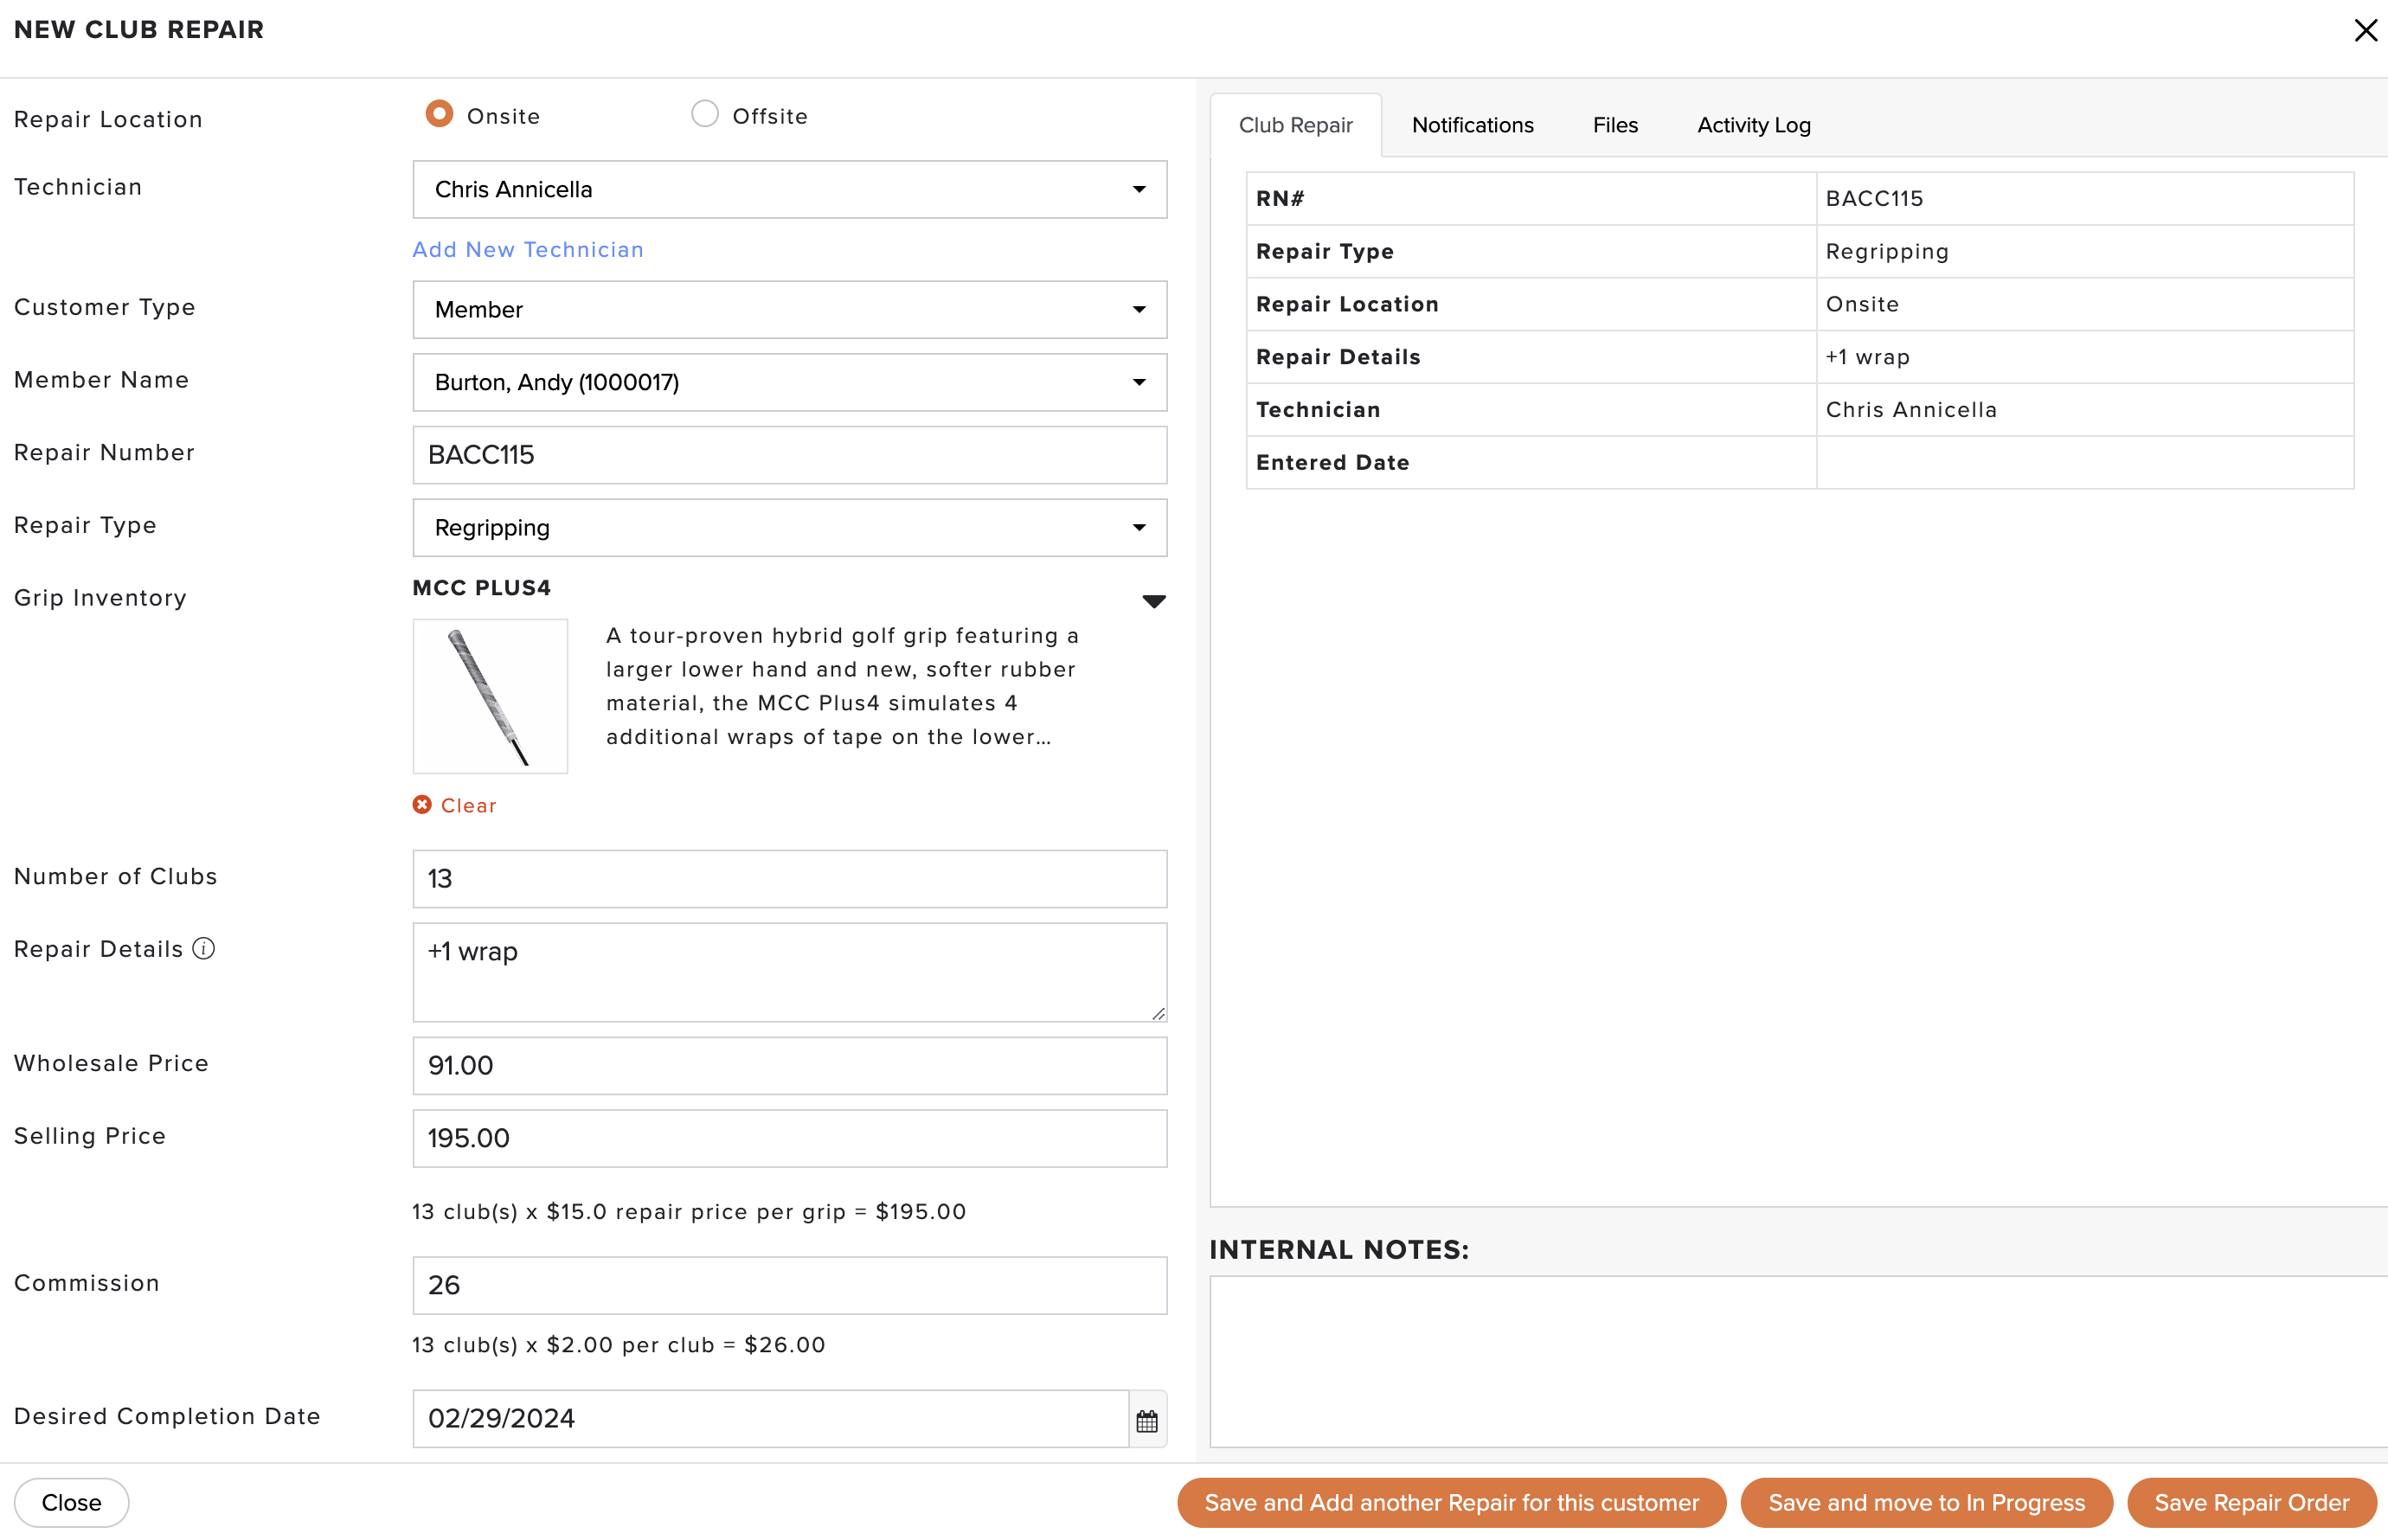
Go to Services > Club Repairs > Dashboard > New Club Repair (as shown below).
Enter or select the following special order details:
Repair Location: Will the club repair:
Onsite: The club repair will be completed at the facility by a technician.
Offsite: The club repair will be completed by a Club Repair Vendor and sent offsite for repair.
Technician (Onsite Repair): Assign a specific Club Repair Technician to the order to track, notify, and assign commission. Or leave the order unassigned and send a repair request notification to technicians (details below).
Add New Technician: Create a new Club Repair Technician on the fly and add them to the order for tracking, notification, and commission assignment. You can later edit the technician for the Club Repair Technician page.
Request Technician (Unassigned Onsite Repair): Select the technicians to whom to send the repair request (or click "Select All" to select all technicians). Requests are assigned on a first-come basis, so the first technician to accept the request will be assigned to the repair.
Vendor (Offsite Repair): Assign Club Repair Vendors to the club repair.
Customer Type: Select the appropriate customer type (i.e., Member or Guest).
Members: Enter the following member information:
Member Name: Select the member name from your member roster.
Guest: Enter the following guest details (Note: If you maintain a Guest Roster, you can start typing a guest's first name, last name, or email in the respective field and then select that guest saved to the guest roster.):
Guest First Name: Enter the Guest First Name.
Guest Last Name: Enter the Guest Last Name.
Guest Email: If a guest is placing the order, enter their email address for email notifications and contact info.
Guest Cell Phone: If a guest is placing the order, enter their cell phone # for text message notifications and contact info.
Add to Guest Roster: If this is a new guest, you can save them to your Guest Roster.
Repair Number: The running Club Repair Number will be populated here. You can edit the club repair number (if necessary).
Repair Type: Select the repair type being performed for this club repair.
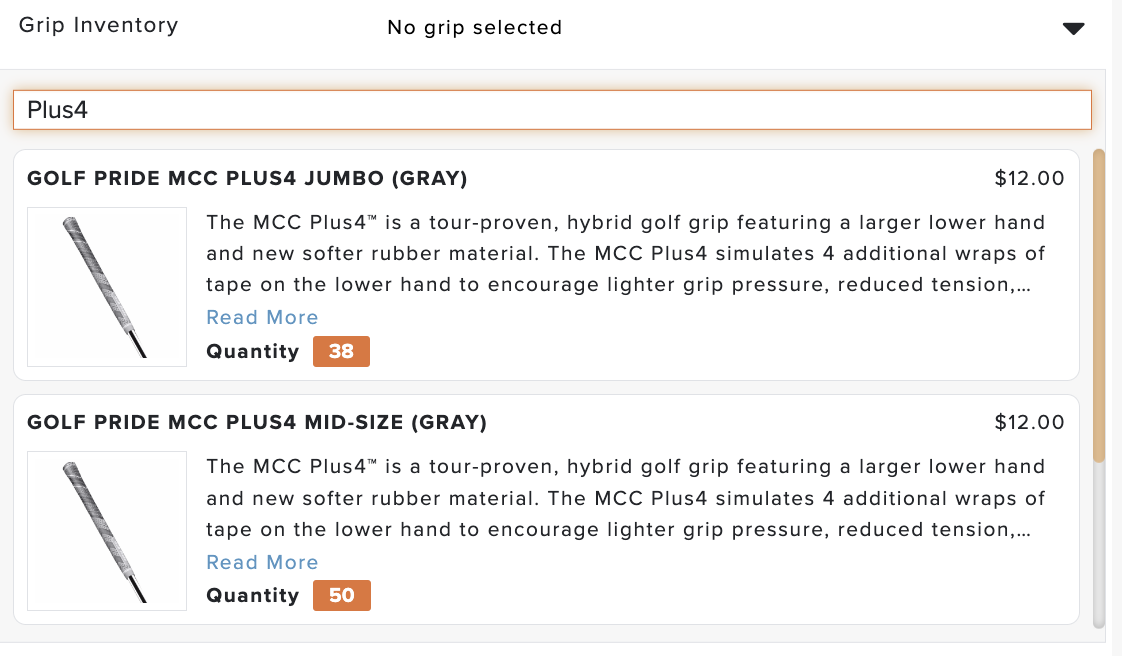
Grip Inventory (Regripping Repair Type Only): If you have entered your Grip Inventory and use the Regripping repair type, select a grip from your inventory. If you have a large grip inventory, you can also search the inventory to narrow down your results (as shown below). Note: When selecting grips from your inventory, they will be marked as pending (on the grip inventory page) for "Repairs Entered" and removed from inventory when moved to "Repairs in Progress."

Number of Clubs: Enter the number of clubs to be repaired with the order. By default, the quantity is one, but if ordering multiple quantities, re-enter the correct value.
Repair Details: Enter the clubs to be repaired, the required materials, and any other important club repair details.
Wholesale Price: Enter the item's wholesale price.
Selling Price: Enter the item's selling price.
Commission: If a repair type has a defined commission, this field will automatically be populated. If another commission was deemed necessary for an order, re-enter the correct value.
Desired Completion Date: The date the club repair is expected to be completed by the technician or offsite vendor.
Vendor Notes (Offsite Repair): Enter any special instructions that need to be assigned to the order. These instructions should be conveyed to the vendor before clubs are shipped.
Outbound Shipping (Golf Shop → Vendor) (Offsite Repair): Enter the outbound shipping details for the offsite repair. The following details can be entered:
Vendor Confirmation Number
Shipping Company
Expected Ship Date
Expected Delivery Date
Shipping Cost
Return Shipping (Vendor → Golf Shop) (Offsite Repair): Enter the return shipping details for the offsite repair. The following details can be entered:
Vendor Confirmation Number
Shipping Company
Expected Ship Date
Expected Delivery Date
Shipping Cost
Internal Notes: Enter any internal notes (viewable only by managers) specific to the order. The internal notes can be viewed and edited at any time during the club repair process.
When you have filled out all the club repair details, you will have multiple choices depending on the club repair order:
Save and Add another Repair for this customer: Allows you to create a repair order with multiple repair types. Further, details from the first order populate the second order for quick entry of multiple items. For more details about multiple item repair orders, Click Here.
Save and Request Technician: If you did not assign a specific technician to a repair order, the only option available will be "Save and Request Technician." Once clicked, an email will be sent to your technicians, where they can pick up the repair order and be assigned as the repair technician.
Note: If this option is selected, available technicians will receive an email notification (if enabled) and a text message notification (if enabled) that a club repair order is available to assign to themself.Save Repair Order: If you intend to wait before this club repair is started, click "Save Repair Order." The order will then be placed in the "Repairs Entered" stage (as shown below). The information has been entered at this stage, and the club repair is ready to be started by a technician or sent to an offsite vendor.
Note: If this option is selected, the technician will receive an email notification (if enabled) and a text message notification (if enabled).Save and move to In Progress: To create the club repair and immediately start the repair process, click "Save and Move to In Progress." The club repair will immediately be placed in the "Repairs in Progress" stage on the dashboard (as shown below).
Note: If this option is selected, the member/guest will receive an email notification (if enabled) and a text message notification (if enabled). You can further customize the automated notification to include a personalized message to the individual by clicking on the "Edit this specific message." For more details on customizing notifications on the fly, Click Here.
Repair Notification Tab
When creating a club repair, you can define whether the technician and customer should receive automated email and text notifications during the club repair process (as shown below). For more details about managing automated emails, Click Here. For more information about managing automated text messages, Click Here.
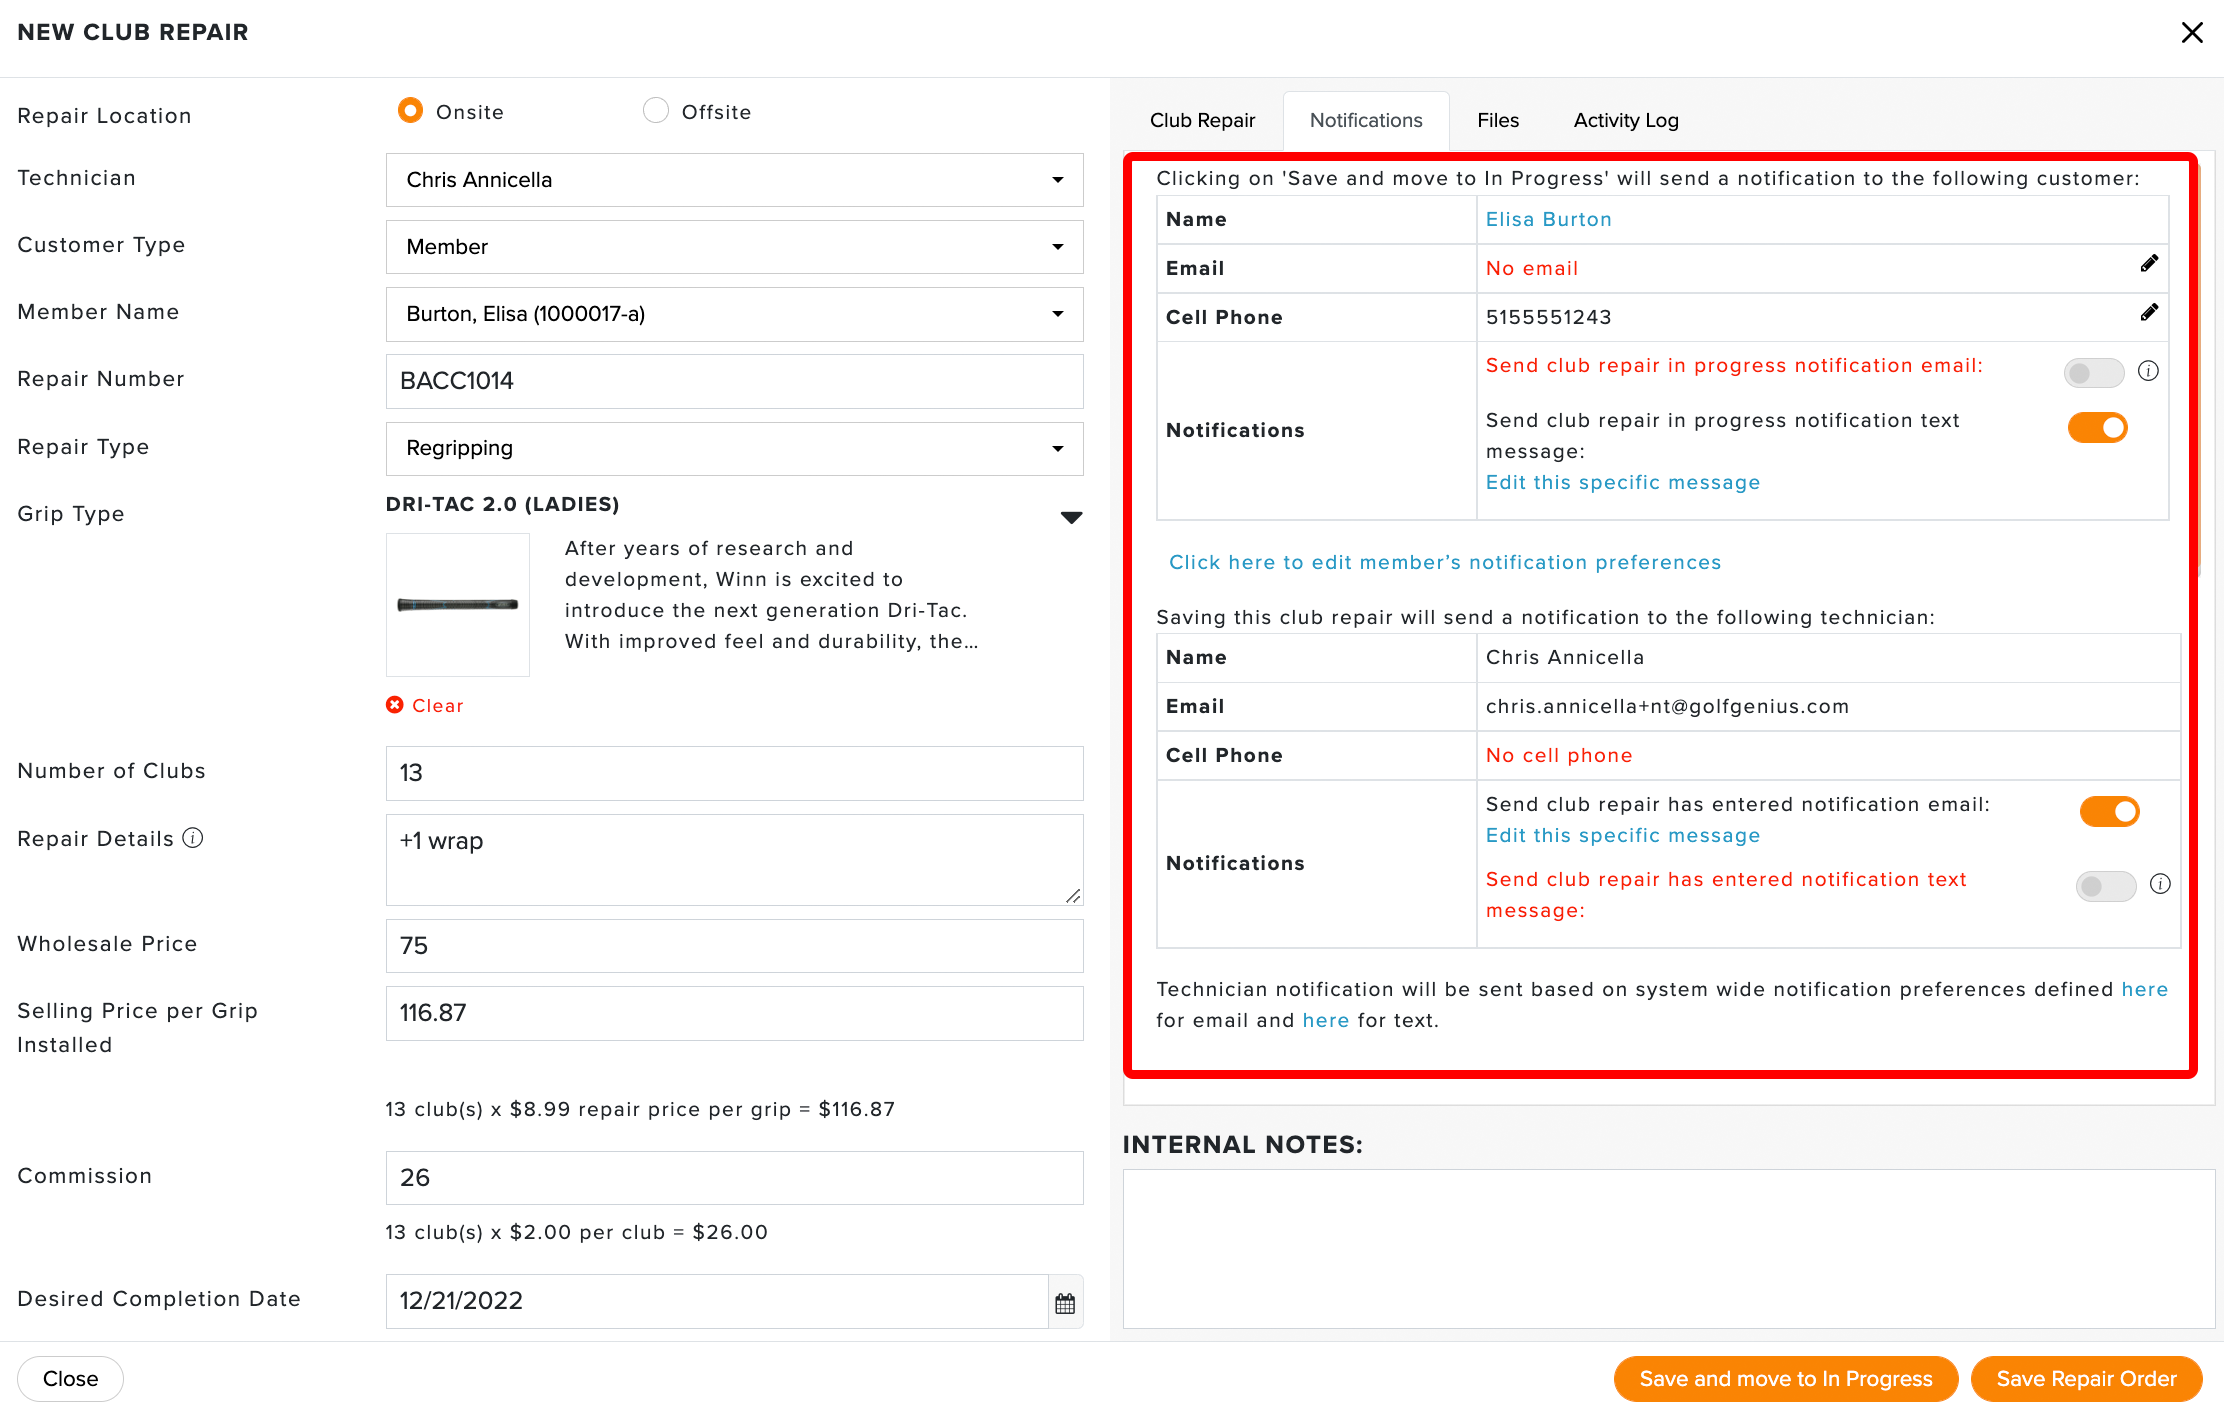
For all the automated emails, you can also view the Email Delivery Report to ensure emails were delivered successfully and identify those that were not. Click Here for more details.
Repair Files Tab
If you need to upload files to the club repair, you can do so from the files tab (as shown below).

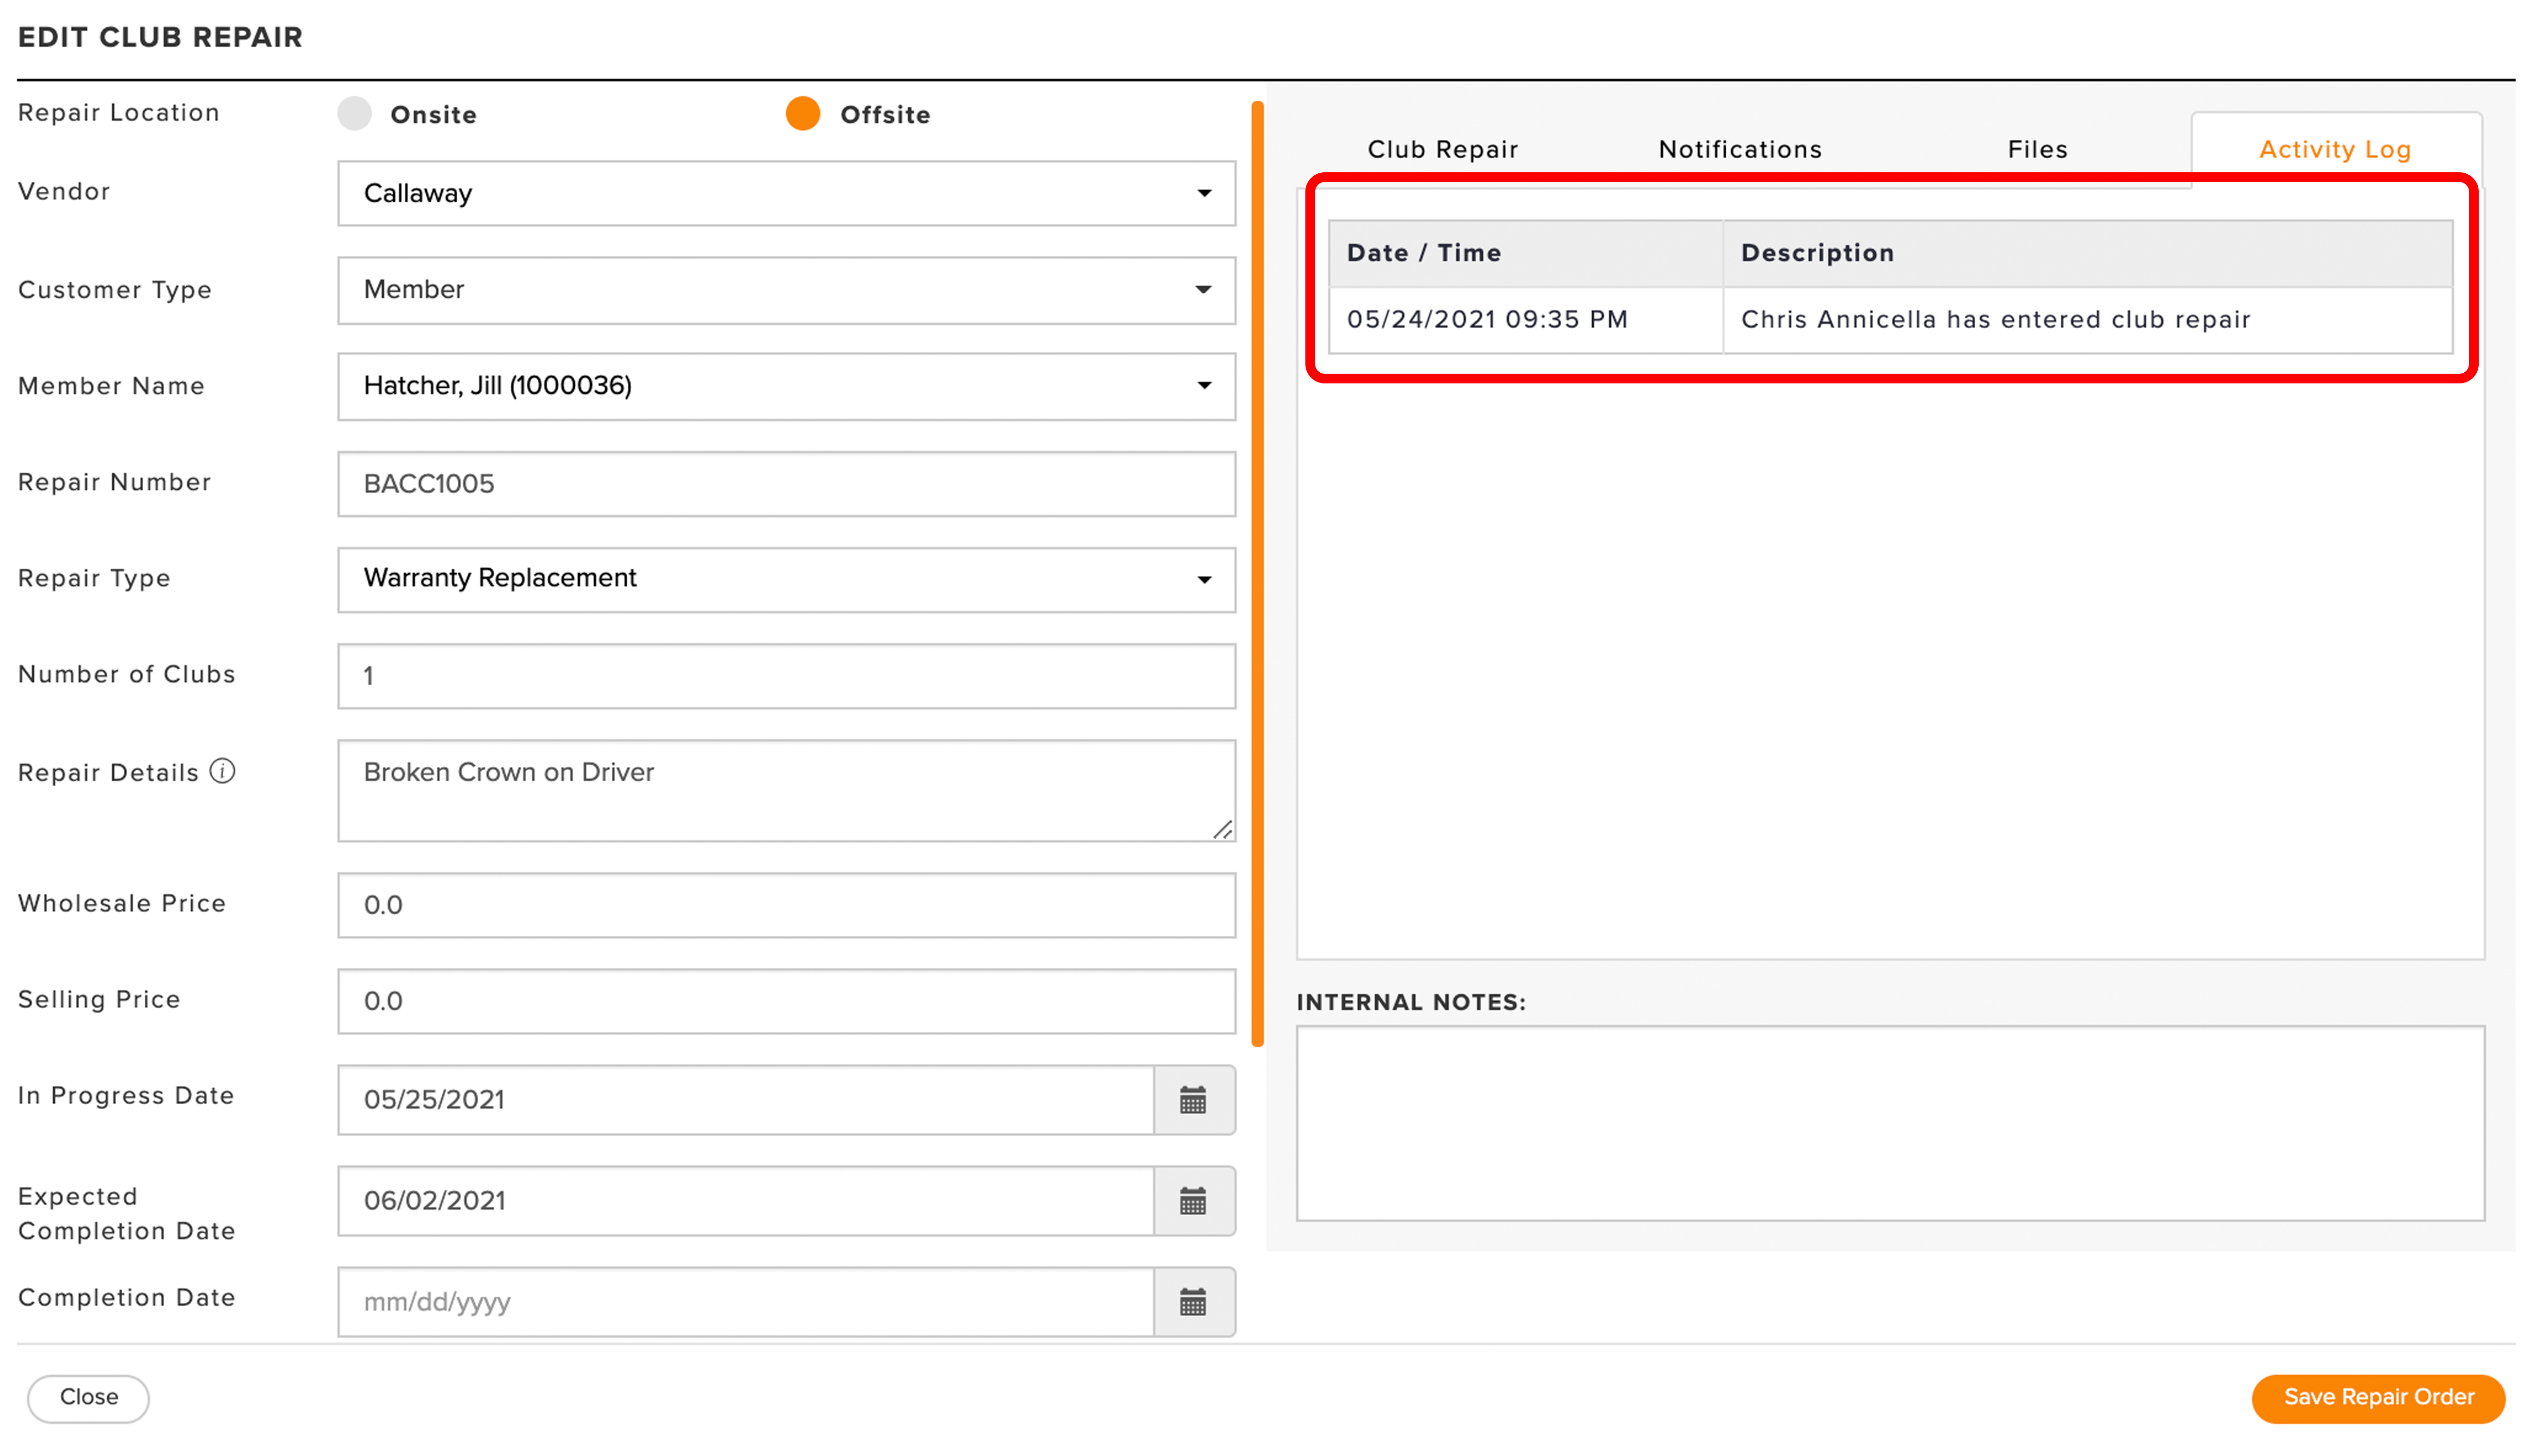
Activity Log
In the Activity Log tab, you can view which actions were taken, who took them, manual and automated email delivery details, and the timestamp for any activity related to a club repair. The Activity Log automatically uses the logged-in manager when determining who took action.