The first step in the special order process is entering the order information and placing it in the "Orders to Place" stage. Orders can be entered using a computer or mobile device using the Golf Genius Golf Shop App. Click Here for more details about entering orders with the App.
In this article, we will discuss the process for entering or creating new special orders on a computer.
Entering Special Orders:
To enter a special order, follow these instructions:
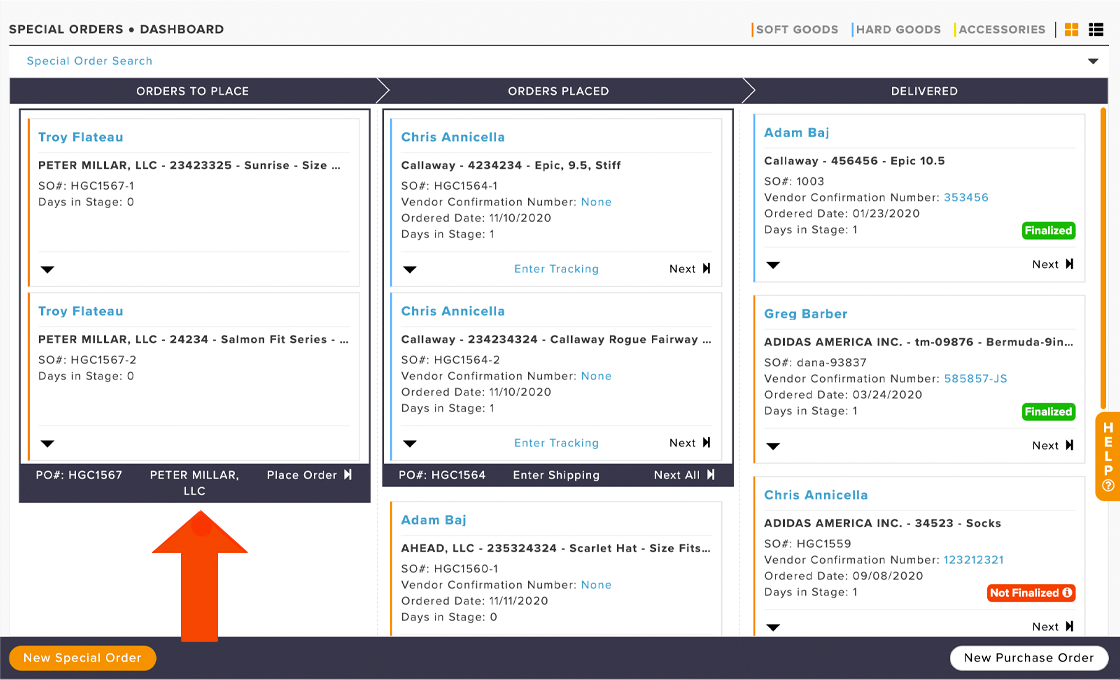
Go to Orders > Special Orders > Dashboard > New Special Order (as shown below).

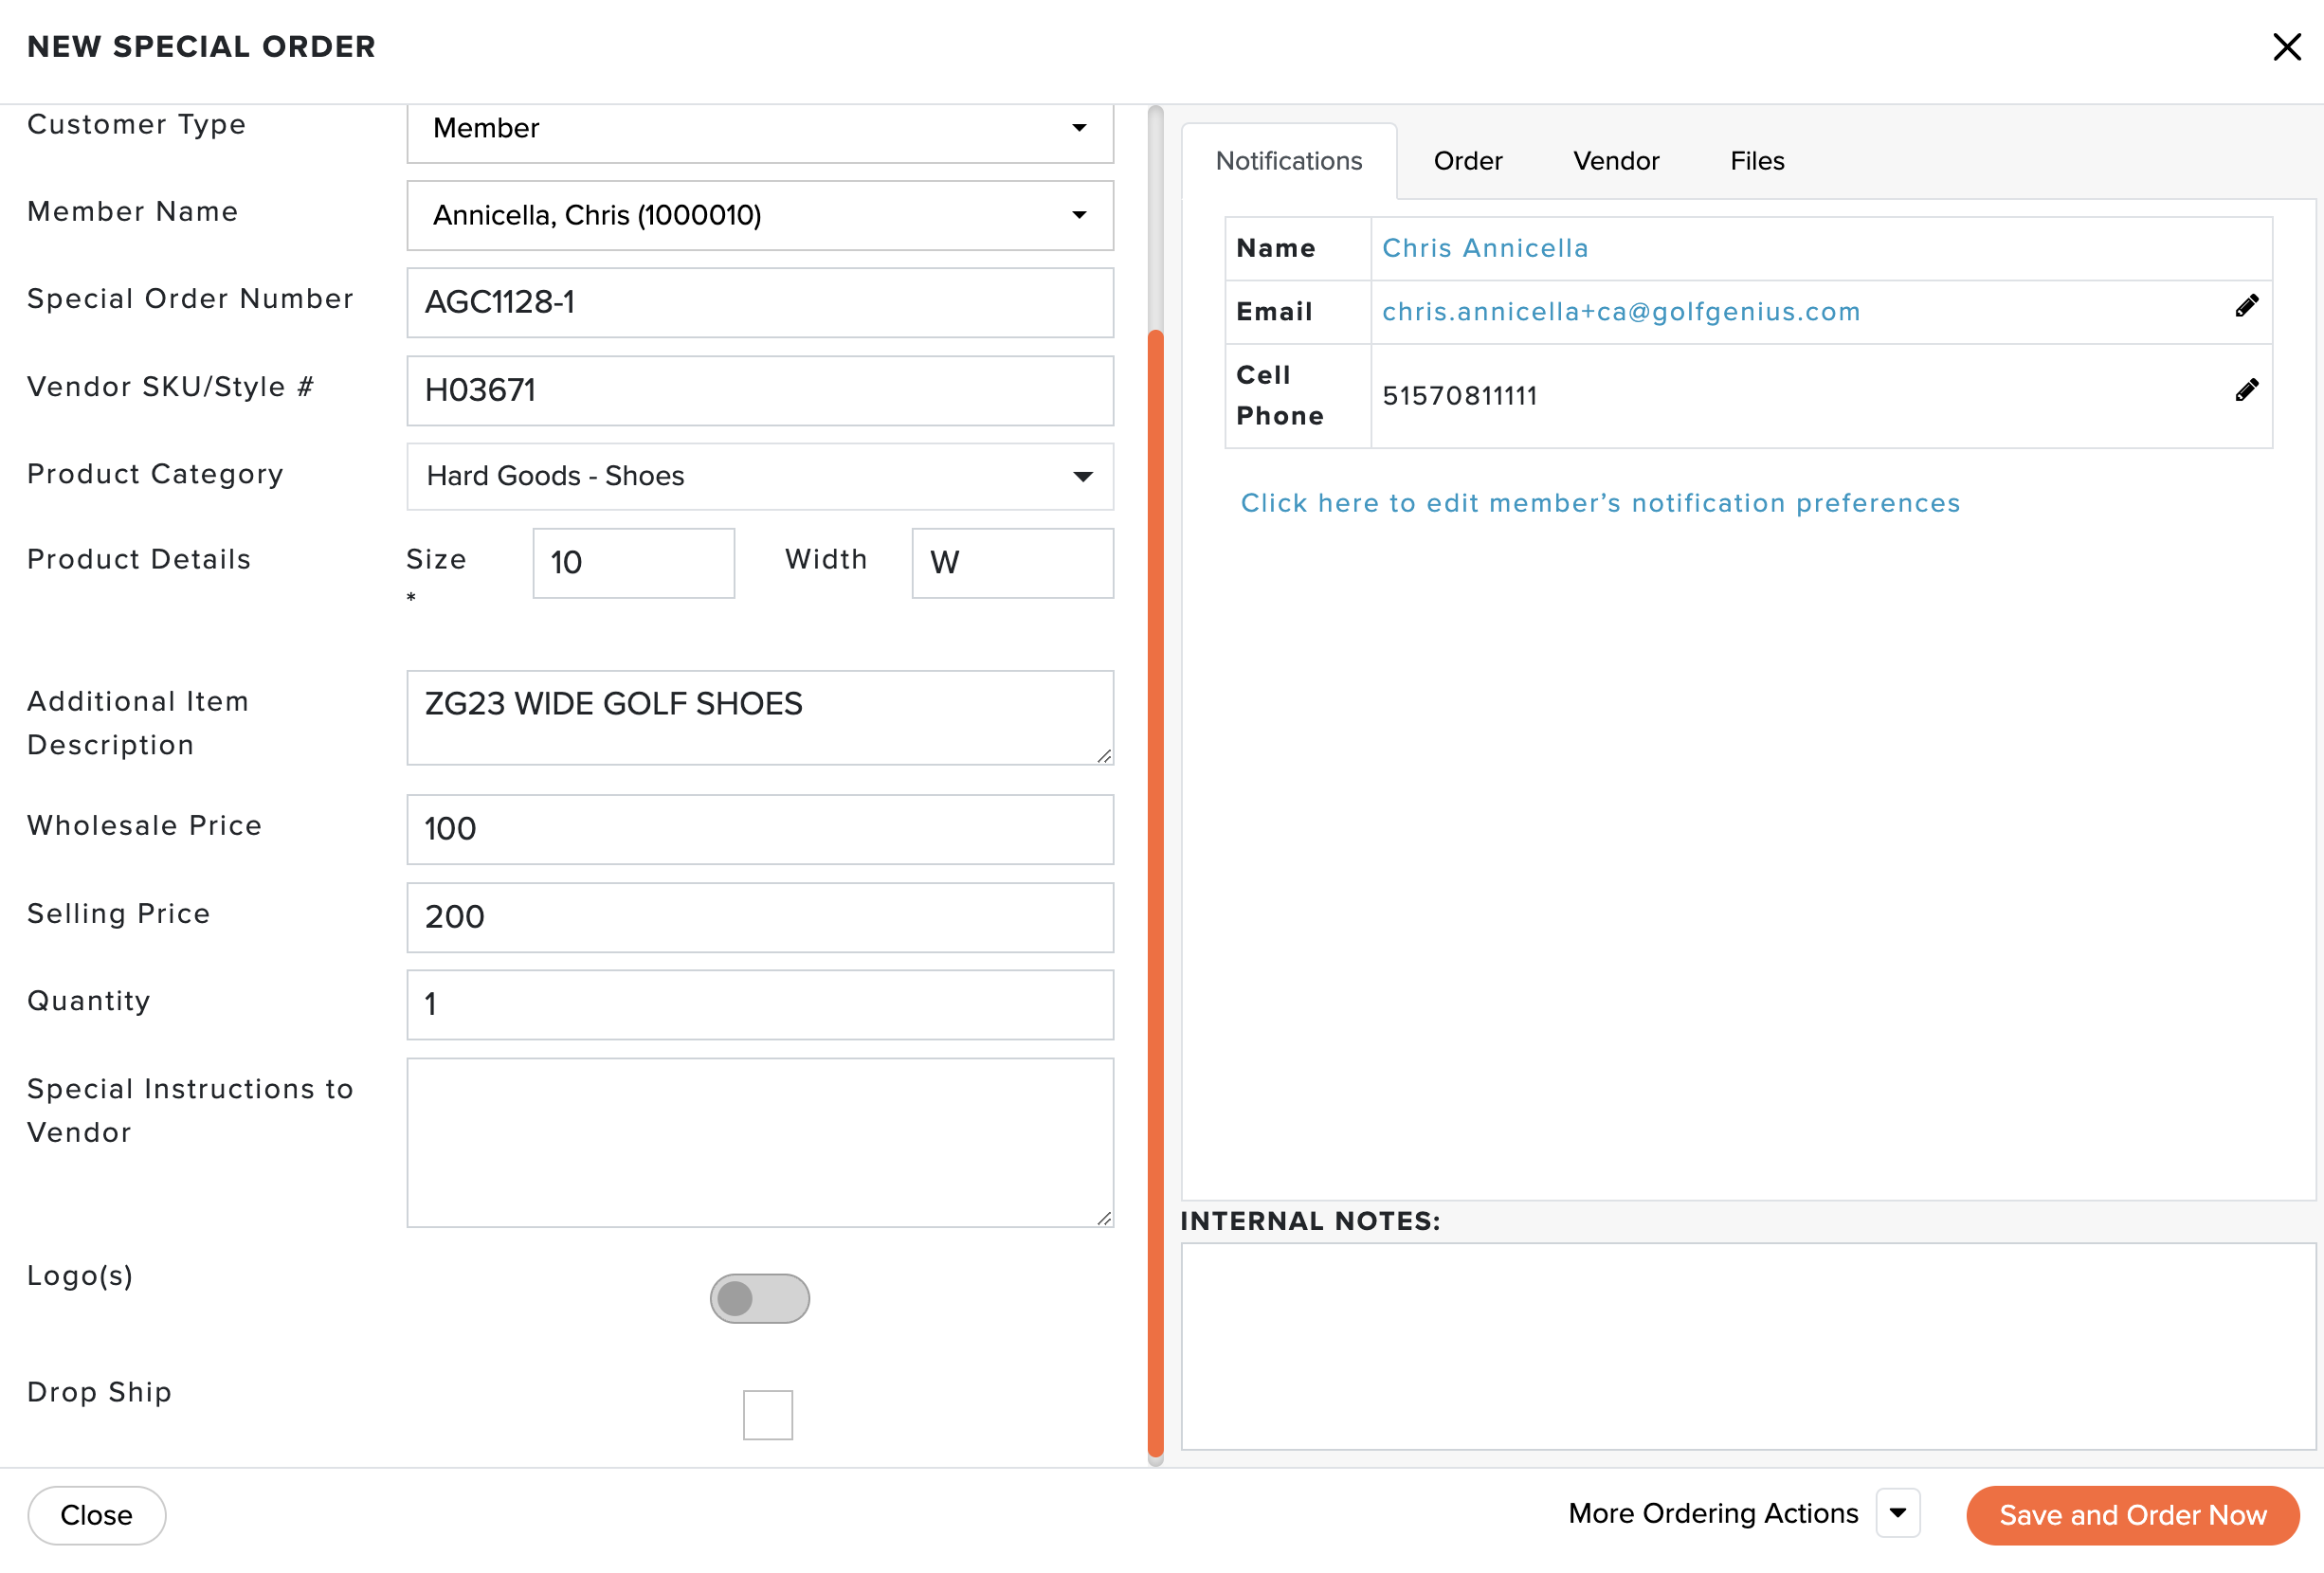
Enter or select the following special order details:
Vendor: Select the vendor of the product being ordered.
Purchase Order: If no existing purchase orders exist for the selected vendor, a new purchase order will be created. If an existing purchase order exists, the special order will be assigned to that existing purchase order. If you would like to create a new one, you will have that option. You can edit a new purchase order number (if necessary).
Customer Type: Select the appropriate customer type (i.e., Member or Guest).
Members: Enter the following member information:
Member Name: Select the member name from your member roster.
Guest: Enter the follow guest detials (Note: If you maintain a Guest Roster, you can start typing a guest's first name, last name, or email in the respective field and then select that guest saved to the guest roster.):
Guest First Name: Enter the Guest First Name.
Guest Last Name: Enter the Guest Last Name.
Guest Email: If a guest is placing the order, enter their email address for email notifications and contact info.
Guest Cell Phone: If a guest is placing the order, enter their cell phone # for text message notifications and contact info.
Add to Guest Roster: If this is a new guest, you can save them to your Guest Roster.
Special Order Number: The running Special Order Number will be populated here. You can edit the special order number (if necessary).
Vendor SKU/Style #: Enter the items Vendor SKU or Style # if you would like it on file.
Product Category: Select the appropriate category to place a special order. Quickly find the product category by typing in the name. By doing this, categories can easily be identified (by color), and you can also filter the orders by category if needed.
Product Details: Product details will be displayed here based on the custom form for the selected category. For details on customizing the product details for the selected category, Click Here.
Additional Item Description: You can enter additional product details here.
Wholesale Price: Enter the wholesale price of the item.
Selling Price: Enter the selling price of the item.
Quantity: Enter the quantity to order. By default, the quantity is one, but if ordering multiple quantities, re-enter the correct value.
Special Instructions to Vendor: Enter any special instructions that need to be assigned to the order. These instructions will be sent to the vendor if placing the order via email.
Internal Notes: Enter any internal notes (can only be viewed by managers) specific to the order. The internal notes can be viewed and edited at any time during the special order process.
Logo: If the item needs a logo or two (clothing item, golf balls, etc.), you can select to attach logo(s) to the order. After selecting the option, go to the "Logo" tab on the right to select the logo(s) to be attached to the order. Additionally, add logo instructions to the vendor so they know where the logos should be placed and color requirements.
Logo Cost: Enter the logo cost.
Drop Ship: If the item needs to be shipped directly to the member or guest, you can select the option for Drop Ship.
Different Recipient: If you are using Drop Shipping, you can send the item to someone other than the member or guest placing the order.
Drop Ship Address: The address to be used for a Drop Shipped special order.
If Necessary, select the dropdown "More Ordering Actions" and click "Save and Add New Item" if you are placing a member order for multiple items. This will allow you to quickly add multiple items to a purchase order for the same vendor. For more detail about placing multiple-item orders, Click Here.
After adding all of the necessary items to the Purchase Order, select one of the following options:
More Ordering Actions: Then select one of the following:
Send Quote: Click "Send Quote" if you need to have the member or guest approve the Special Order before placing it with your vendor. For complete details on sending special order quotes, Click Here.
Save and Add another item to this Order: Allows you to create a purchase order with multiple special orders. Further, details from the first order populate the second order for quick entry of multiple item special orders. For more details about multiple item orders, Click Here.
Save and Order Later: Click "Save and Order Later" if you intend to wait and place the order with the vendor at a later time. The order will then be placed in the "Orders to Place" stage (as shown below). At this stage, the information has been entered, and the purchase order is ready to be placed with the vendor.

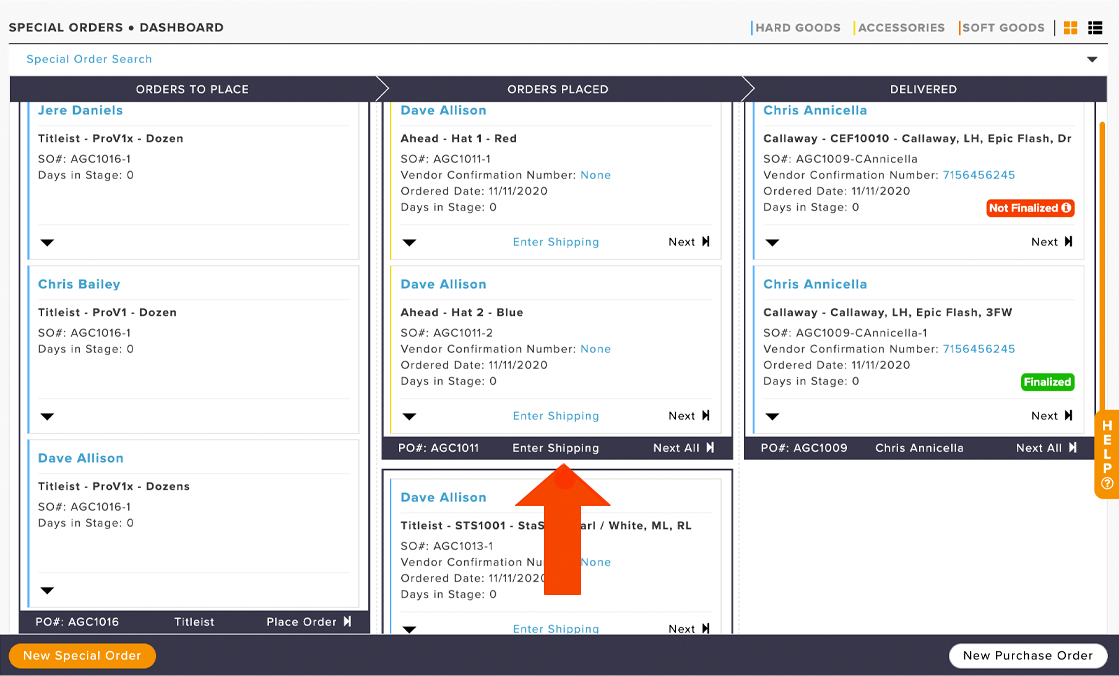
Save and Order Now: Click "Save and Order Now" to create the special order and order it immediately with the vendor. This will take you to the place order screen. Once the order is placed, it will move the special orders to the "Orders Placed" stage on the dashboard (as shown below).