
Note: This feature is only available to customs in North America.
Utilizing the promotion feature is a great way to reduce your club's workload and offer seasonal promotions to your members and guests. The promotion feature lets you promote, collect, and track orders for customized golf ball sales. The most common type is the Buy 3 Dozen Golf Balls and Get One Dozen Free with customization (B3G1).
When running a B3G1 promotion, you have a lot of leg work, from communicating with vendors to getting order forms or microsites made, creating emails, tracking, and more. With the Promotions feature, you no longer need to create emails or track down order forms; best of all, everything is tracked on your Special Order Dashboard in Golf Shop.
In this article, we will discuss the steps necessary to allow you to utilize this feature, such as sending promotions to members, approving them with the vendor, and tracking orders in the Golf Shop.
Participating Vendors:
Promotions are available from the following vendors:
Callaway
Enabling the Integration:
To utilize the Promotions feature, you must enable your vendors integration with Golf Shop. Go to Club Details > Integrations (as shown below) to enable an integration.
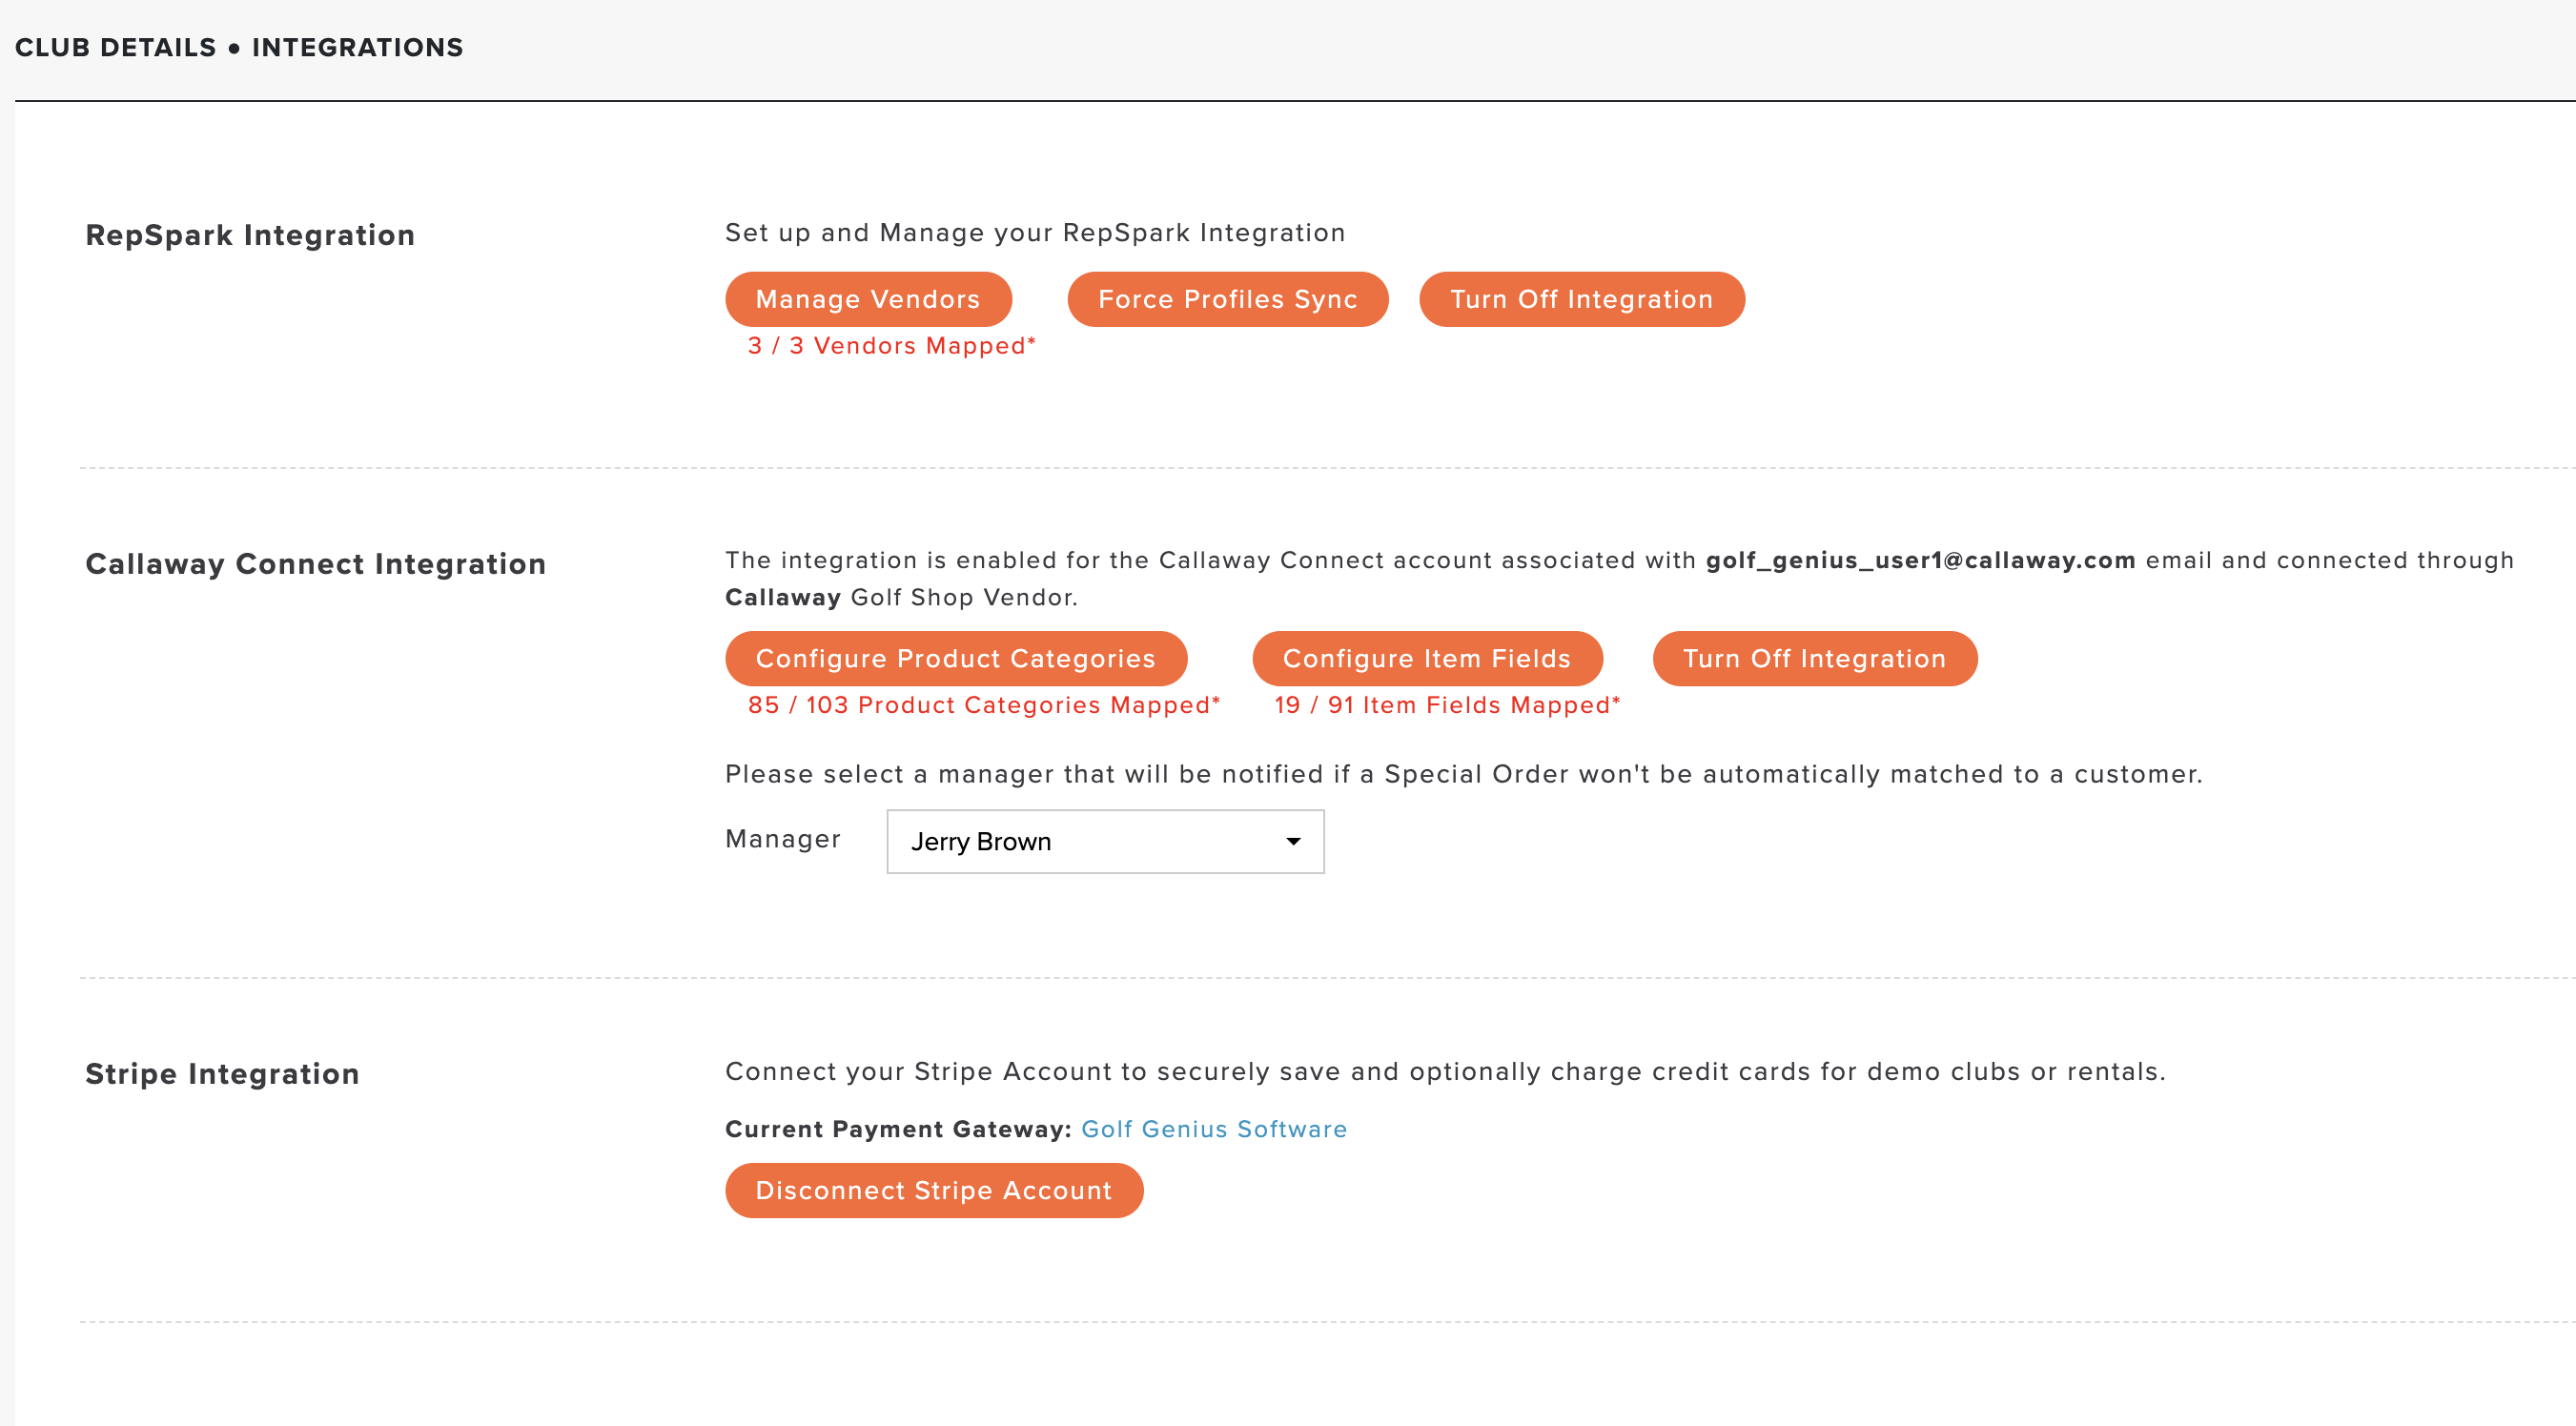
For complete details on enabling a vendor integration to utilize the Promotions feature, click the link below:
Viewing Available Promotions:
You can view all the available vendor promotions from the Promotions Dashboard (as shown below). To access the promotions, go to Orders > Special Orders > Promotions.
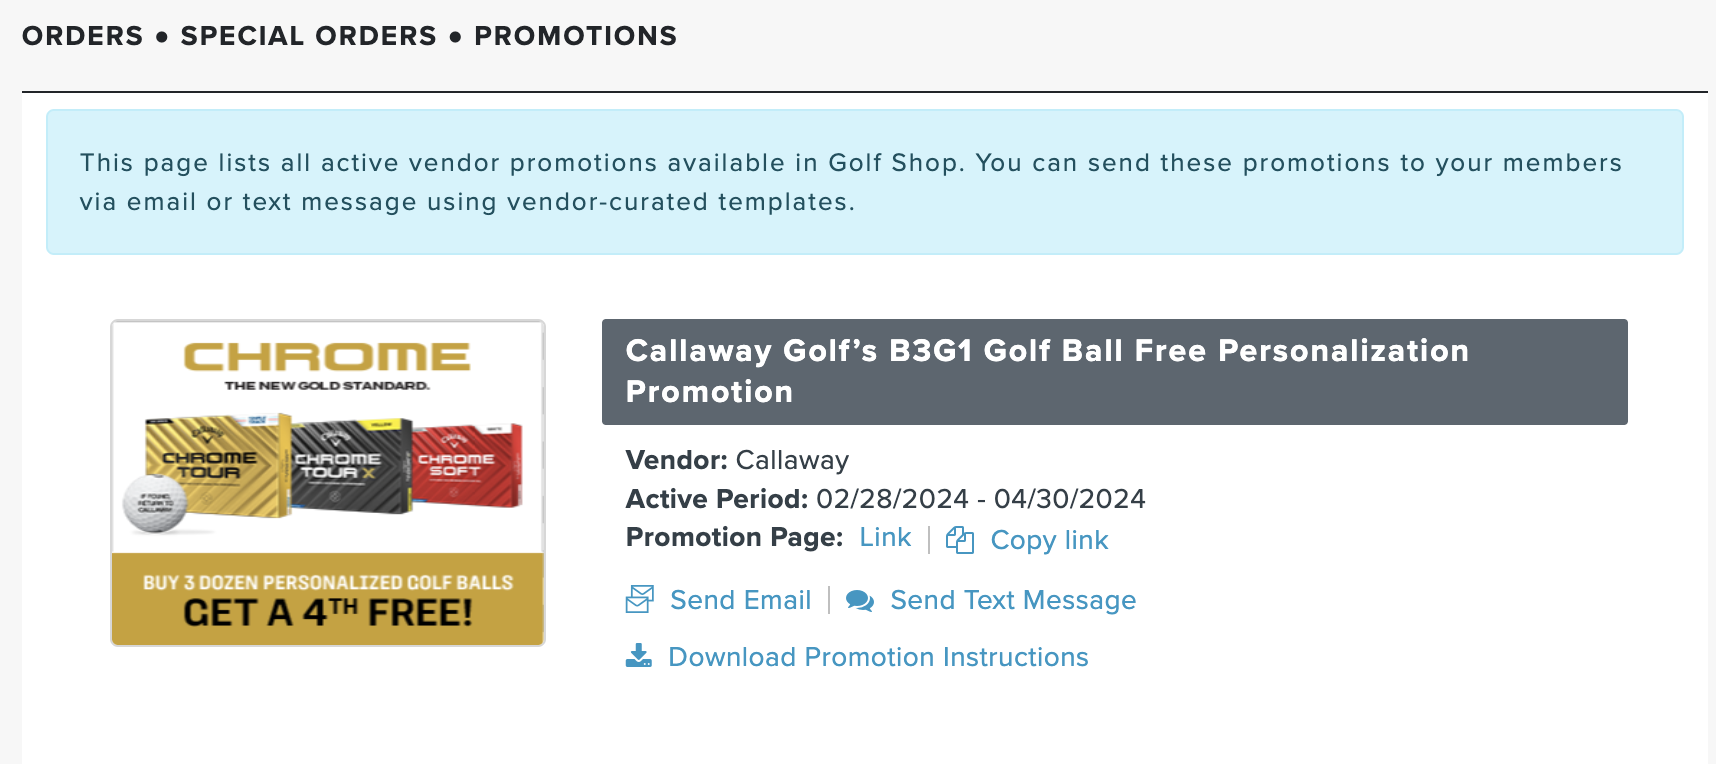
When viewing the promotions dashboard, you will see the following for each promotion:
Thumbnail: Visual graphic of the promotion.
Title: The name of the promotion.
Vendor: The vendor offering the promotion.
Active Period: The length of time the promotion will be available.
The active promotions will have the following available options (links in blue):
Promotion Page:
Link: Clicking "Link" will take you to the promotion page, where you can view the promotional online order form you can share with your members and guests.
Copy Link: If you would like to add the promotion to a club newsletter, website, social media, or any other place you wish to share the form, you can click "Copy Link." The promotion page URL will be copied and available to paste via text.
Send Email: Select this option to email your members the promotion. Note: A pre-built email template is available for every promotion that can be sent to some or all of your members.
Send Text Message: Select this option to send the promotion via text message to your members. Note: A pre-built text message template, available for every promotion, can be sent to some or all of your members.
Download Promotion Instructions (if available): View the promotion details and order instructions curated by the vendor.
Communicating the Promotion:
There are several ways you will be able to communicate the promotion:
Email
Text Message
Generic Link
Each option is discussed in greater detail below.
Email:
To send the promotion via email, follow these instructions:
Go to Orders > Promotions.
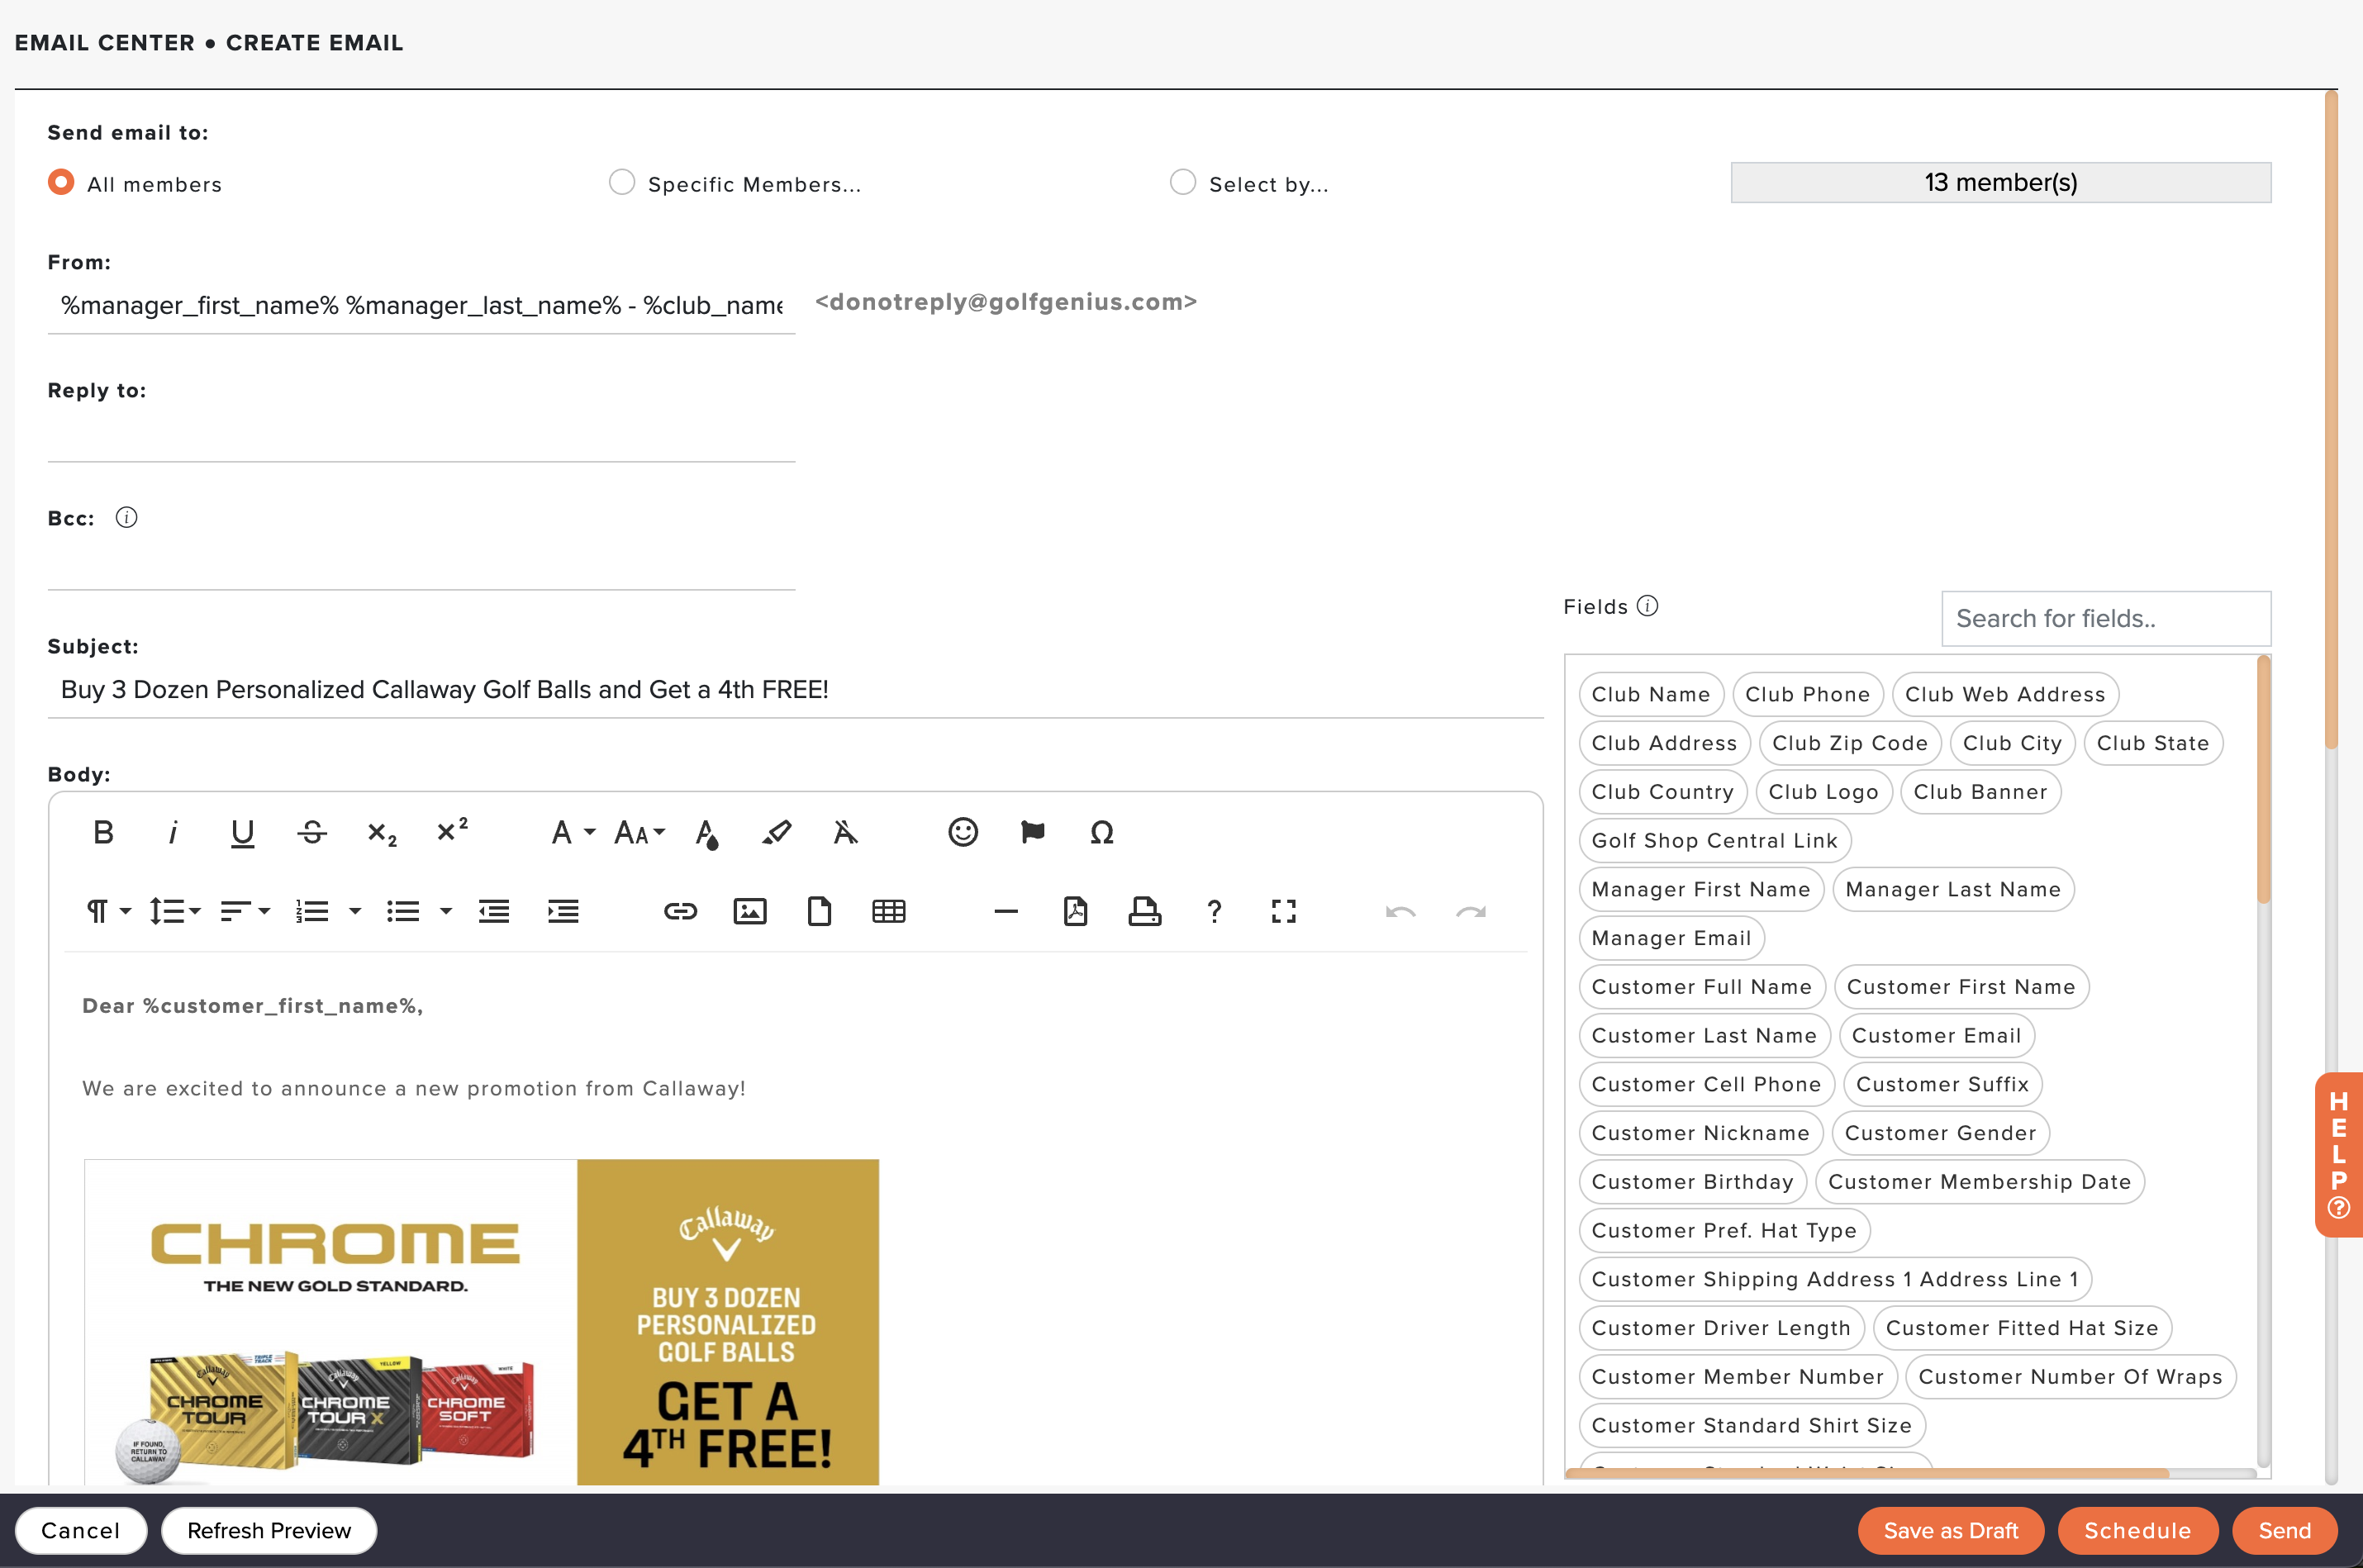
Click "Send Email" for the promotion you wish to send to your members (as shown below).

Select the recipients. You can send it to:
All members: Send to your entire member roster.
Specific members: Search and select specific members.
Select by: You can optionally filter the recipient list using the available custom fields. For instance, you can filter the recipient list by favorite golf ball brand. After selecting the filtering settings, click "Save."
Edit the "From:" (if necessary). When an email is sent, you can modify the text that shows up before the system email (donotreply@golfgenius.com). For example, you could have the from line show your club name, the sender name, or both.
Edit the "Reply to:" (if necessary). If a member responds to the email, this email address will receive the reply.
Edit the "Bcc:"(if necessary). Bcc (Blind Copy) any additional email addresses.
Edit the email "Subject:". Note: A subject will automatically be generated for you but can be edited.
Edit the content of the email's body using the rich text editor. Note: The body has already been curated for you but can be updated as you see fit. Please remember that the body must always contain the dynamic field for the promotion link.
Set an alternate Logo or Banner (if necessary).
Click "Refresh Preview" to preview the email before saving, scheduling, or sending it.
Review the Recipient count to ensure the proper members are receiving the email.
Click one of the following options:
Cancel: Cancel the email. Note: all changes will be lost.
Save as Draft: Save the email as a draft to be updated and scheduled or sent later. All drafts will be saved to the Email Center in the Unsent tile, where they can be updated.
Schedule: Schedule the email to be sent at a specific date and time. All scheduled emails will be saved to the Email Center in the Unsent tile, where they can be updated.
Send: Immediately send the email to the selected members.
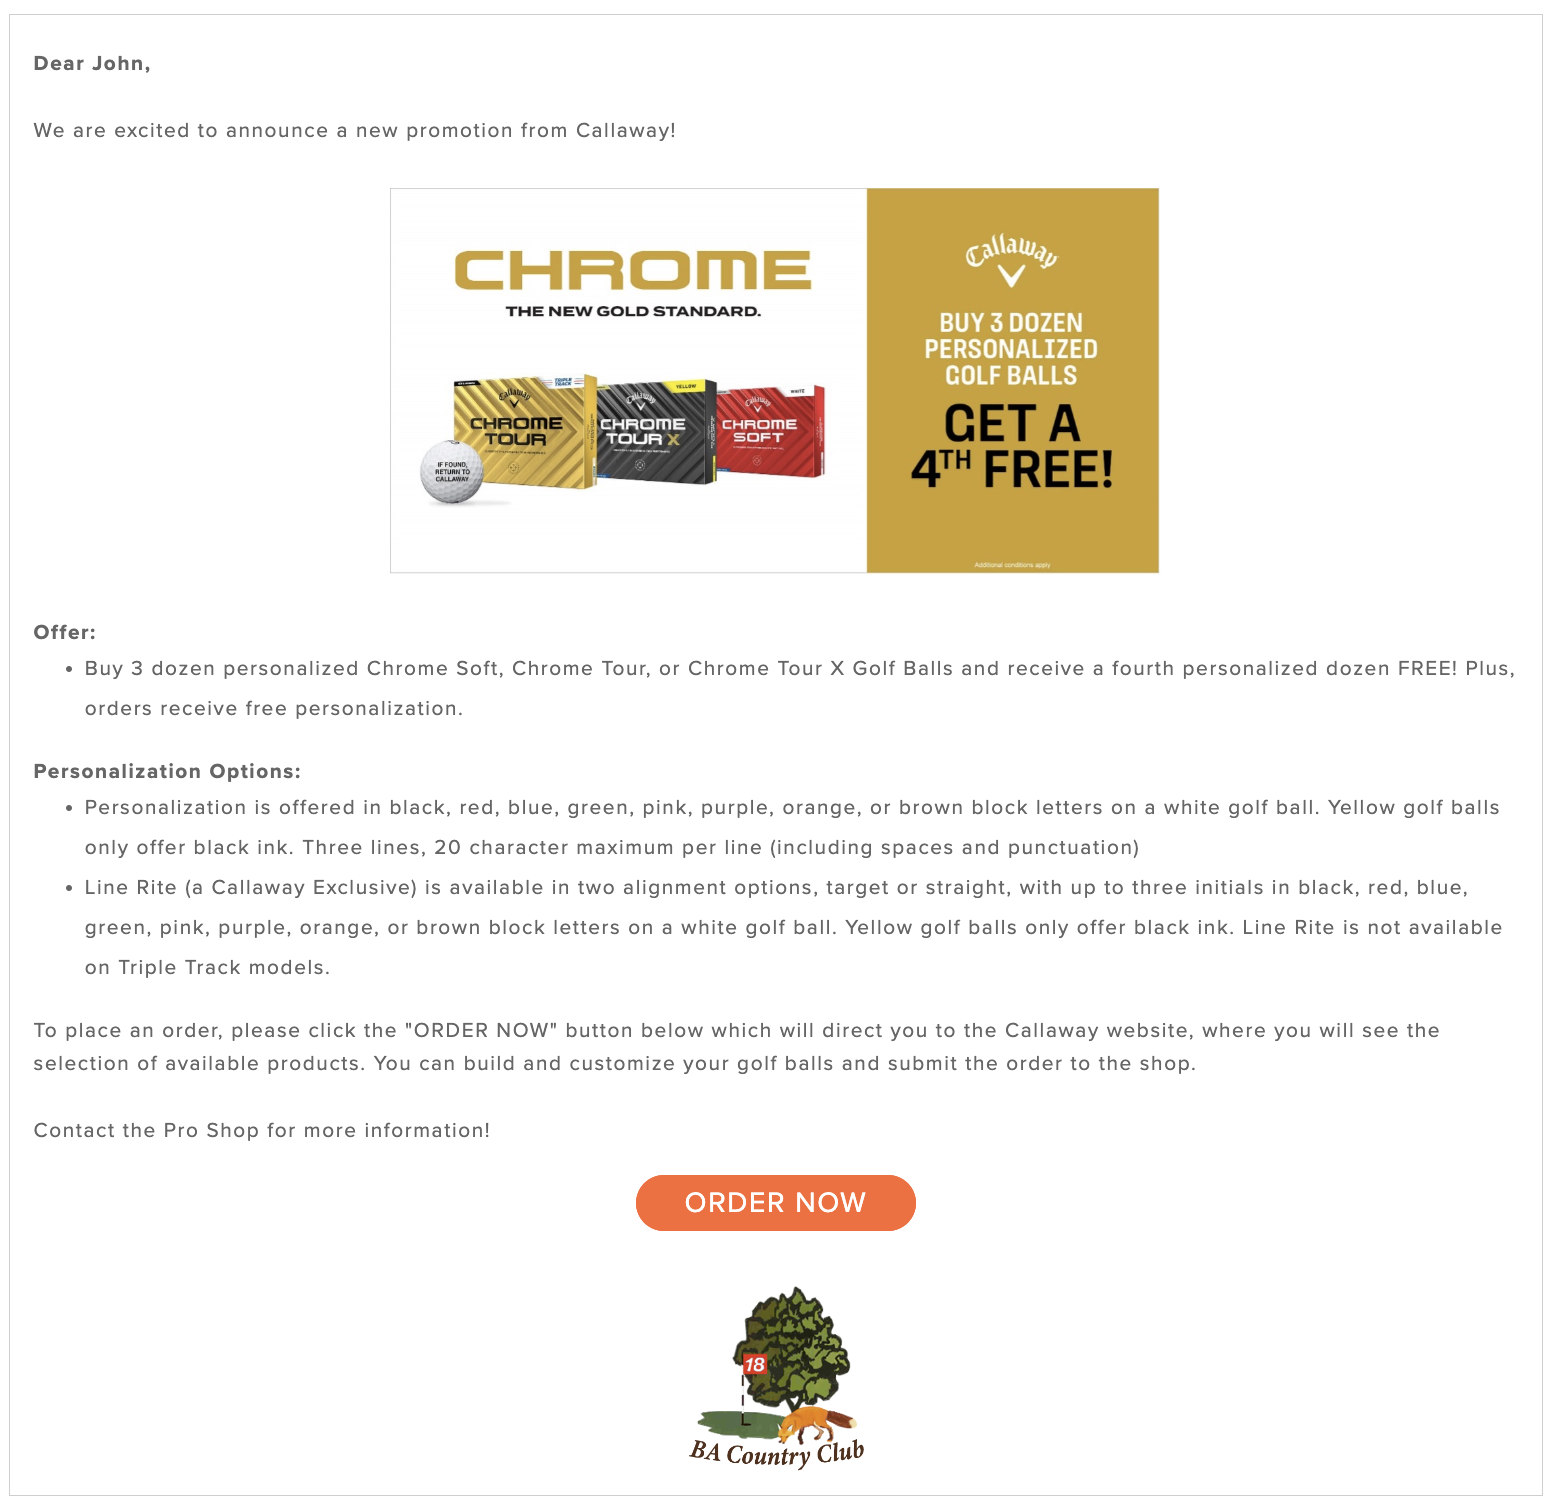
Below is an example email being sent to a member.
Text Message:
To send the promotion via text message, follow these instructions:
Go to Orders > Promotions.
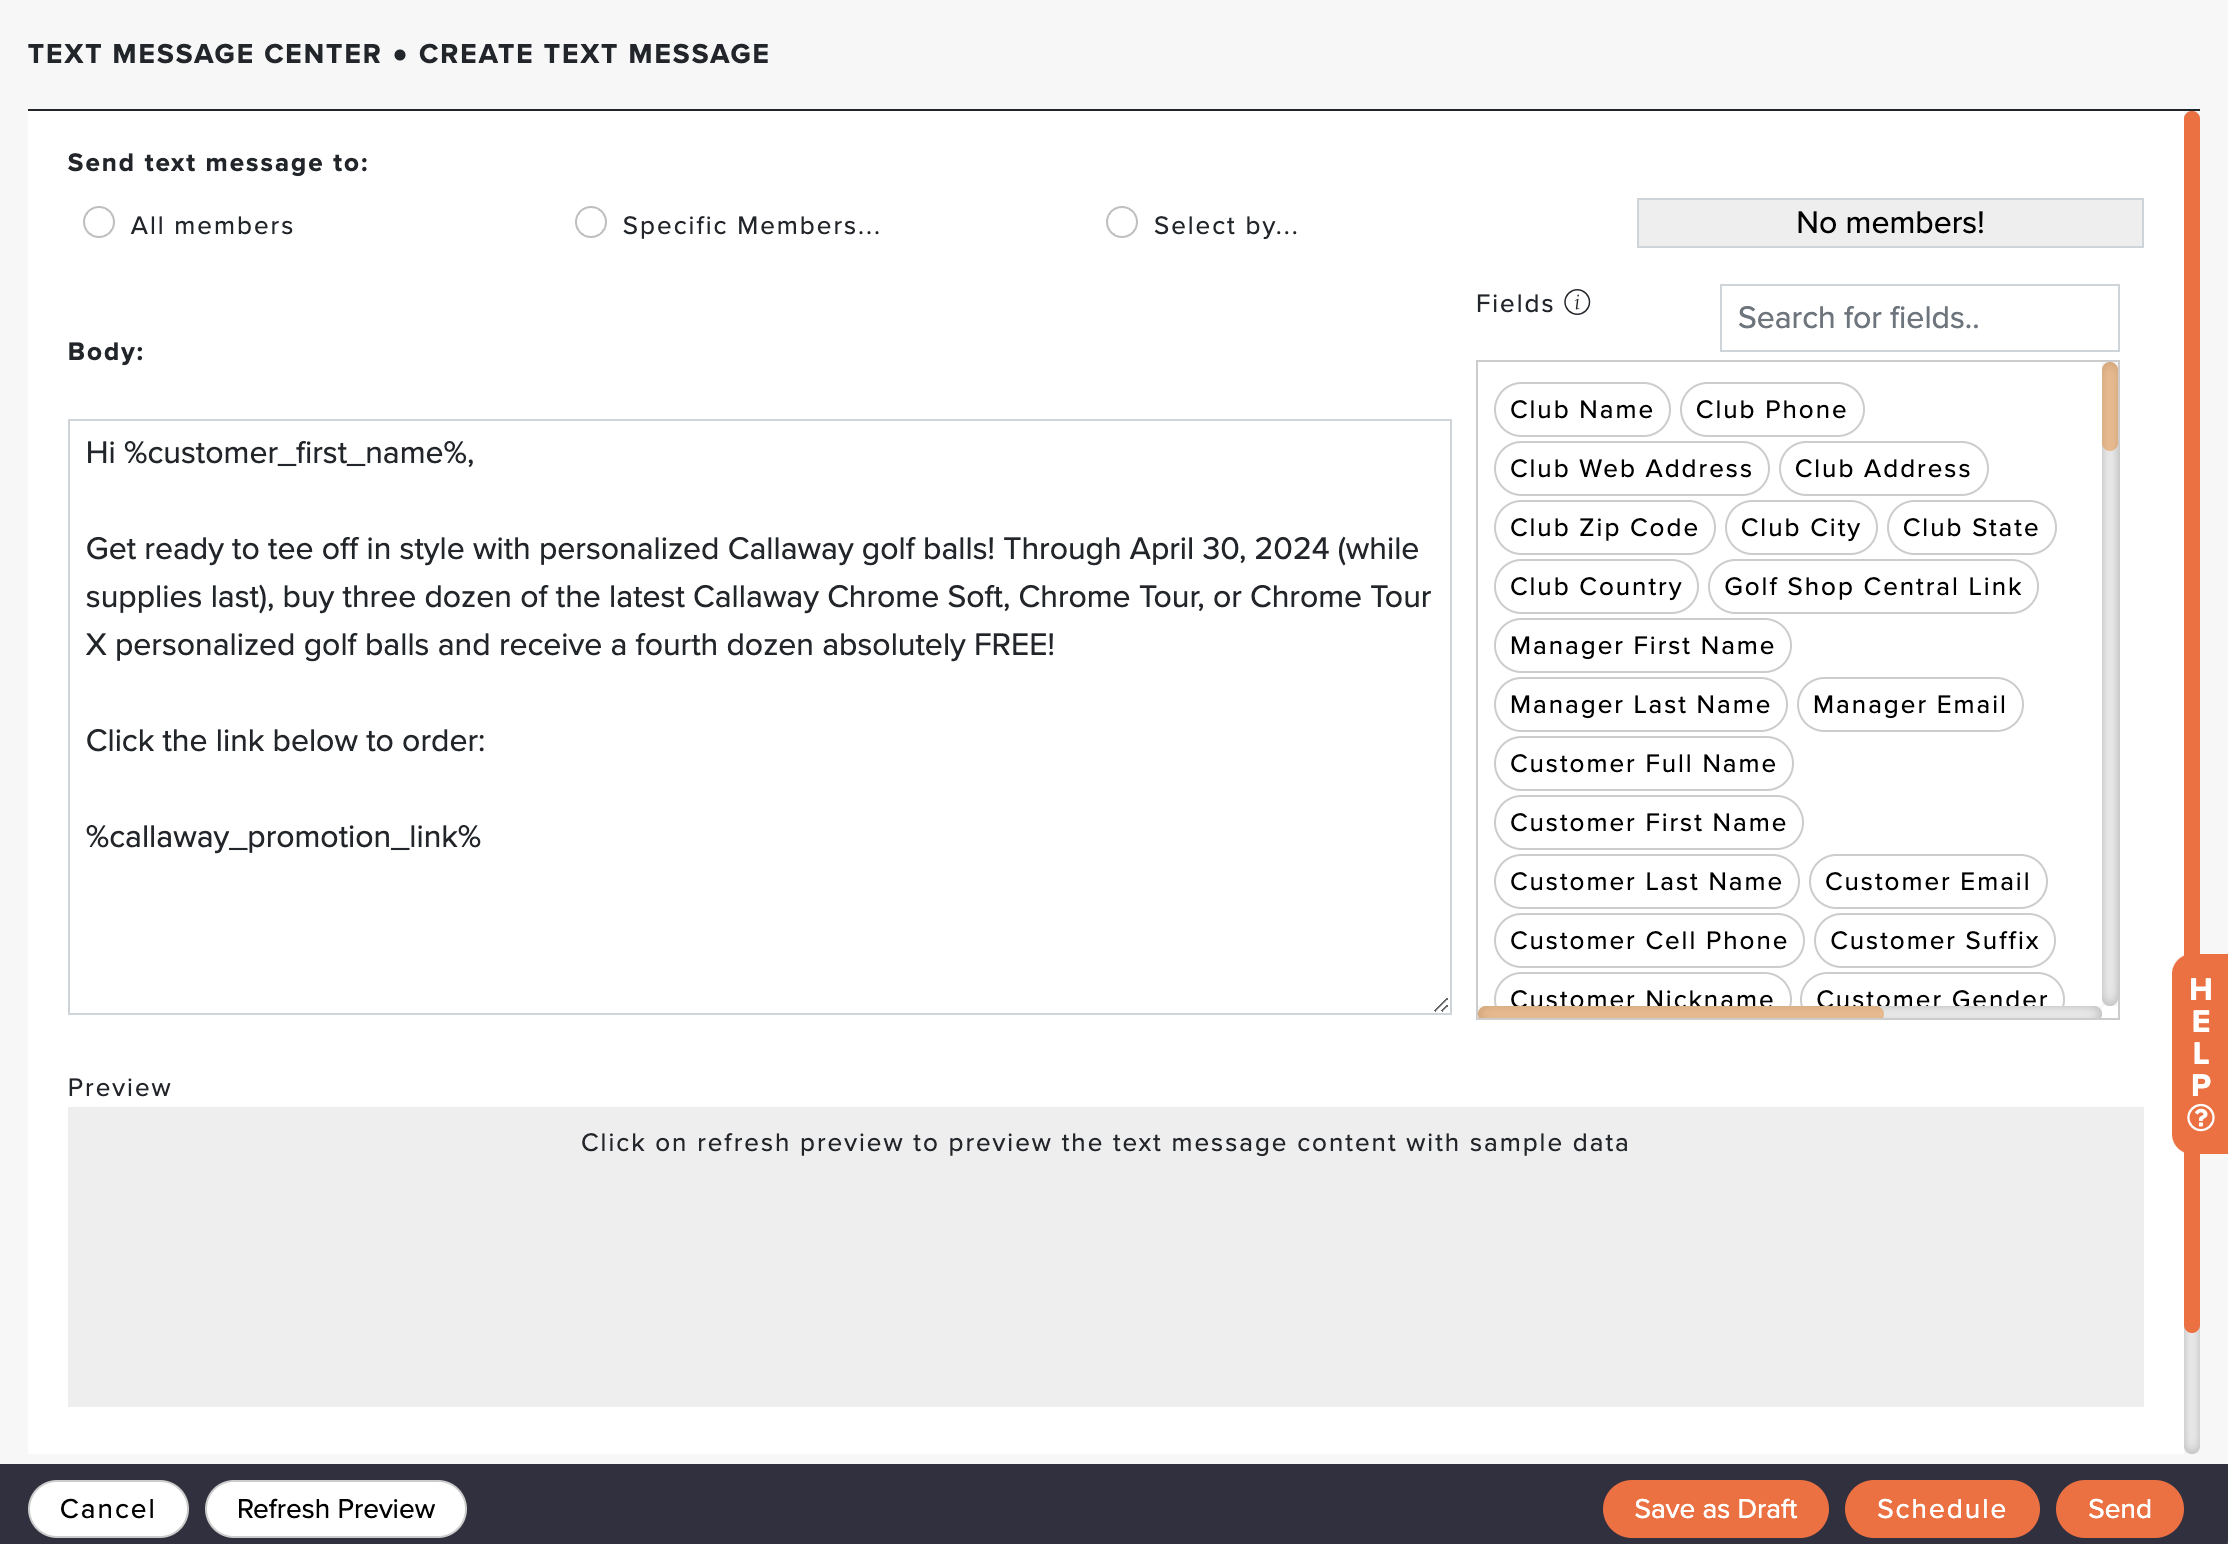
Click "Send Text Message" for the promotion you wish to send to your members (as shown below).

Select the recipients. You can send it to:
All members: Send to your entire member roster.
Specific members: Search and select specific members.
Select by: You can optionally filter the recipient list using the available custom fields. For instance, you can filter the recipient list by favorite golf ball brand. After selecting the filtering settings, click "Save."
Edit the content of the text message body using the text editor. Note: A text message body has already been curated for you but can be updated however you see fit. Please remember that the body must always contain the dynamic field for the promotion link.
Click "Refresh Preview" to preview the message before saving, scheduling, or sending it.
Review the Recipient count to ensure the proper members are receiving the message.
Click one of the following options:
Cancel: Cancel the text message. Note: all changes will be lost.
Save as Draft: Save the message as a draft to be updated, scheduled, or sent later. All drafts are saved to the Text Message Center in the Unsent tile, where they can be updated.
Schedule: Schedule the text message to be sent at a specific date and time. All scheduled text messages will be saved to the Text Messages Center in the Unsent tile, where they can be updated.
Send: Immediately send the text message to the selected members.
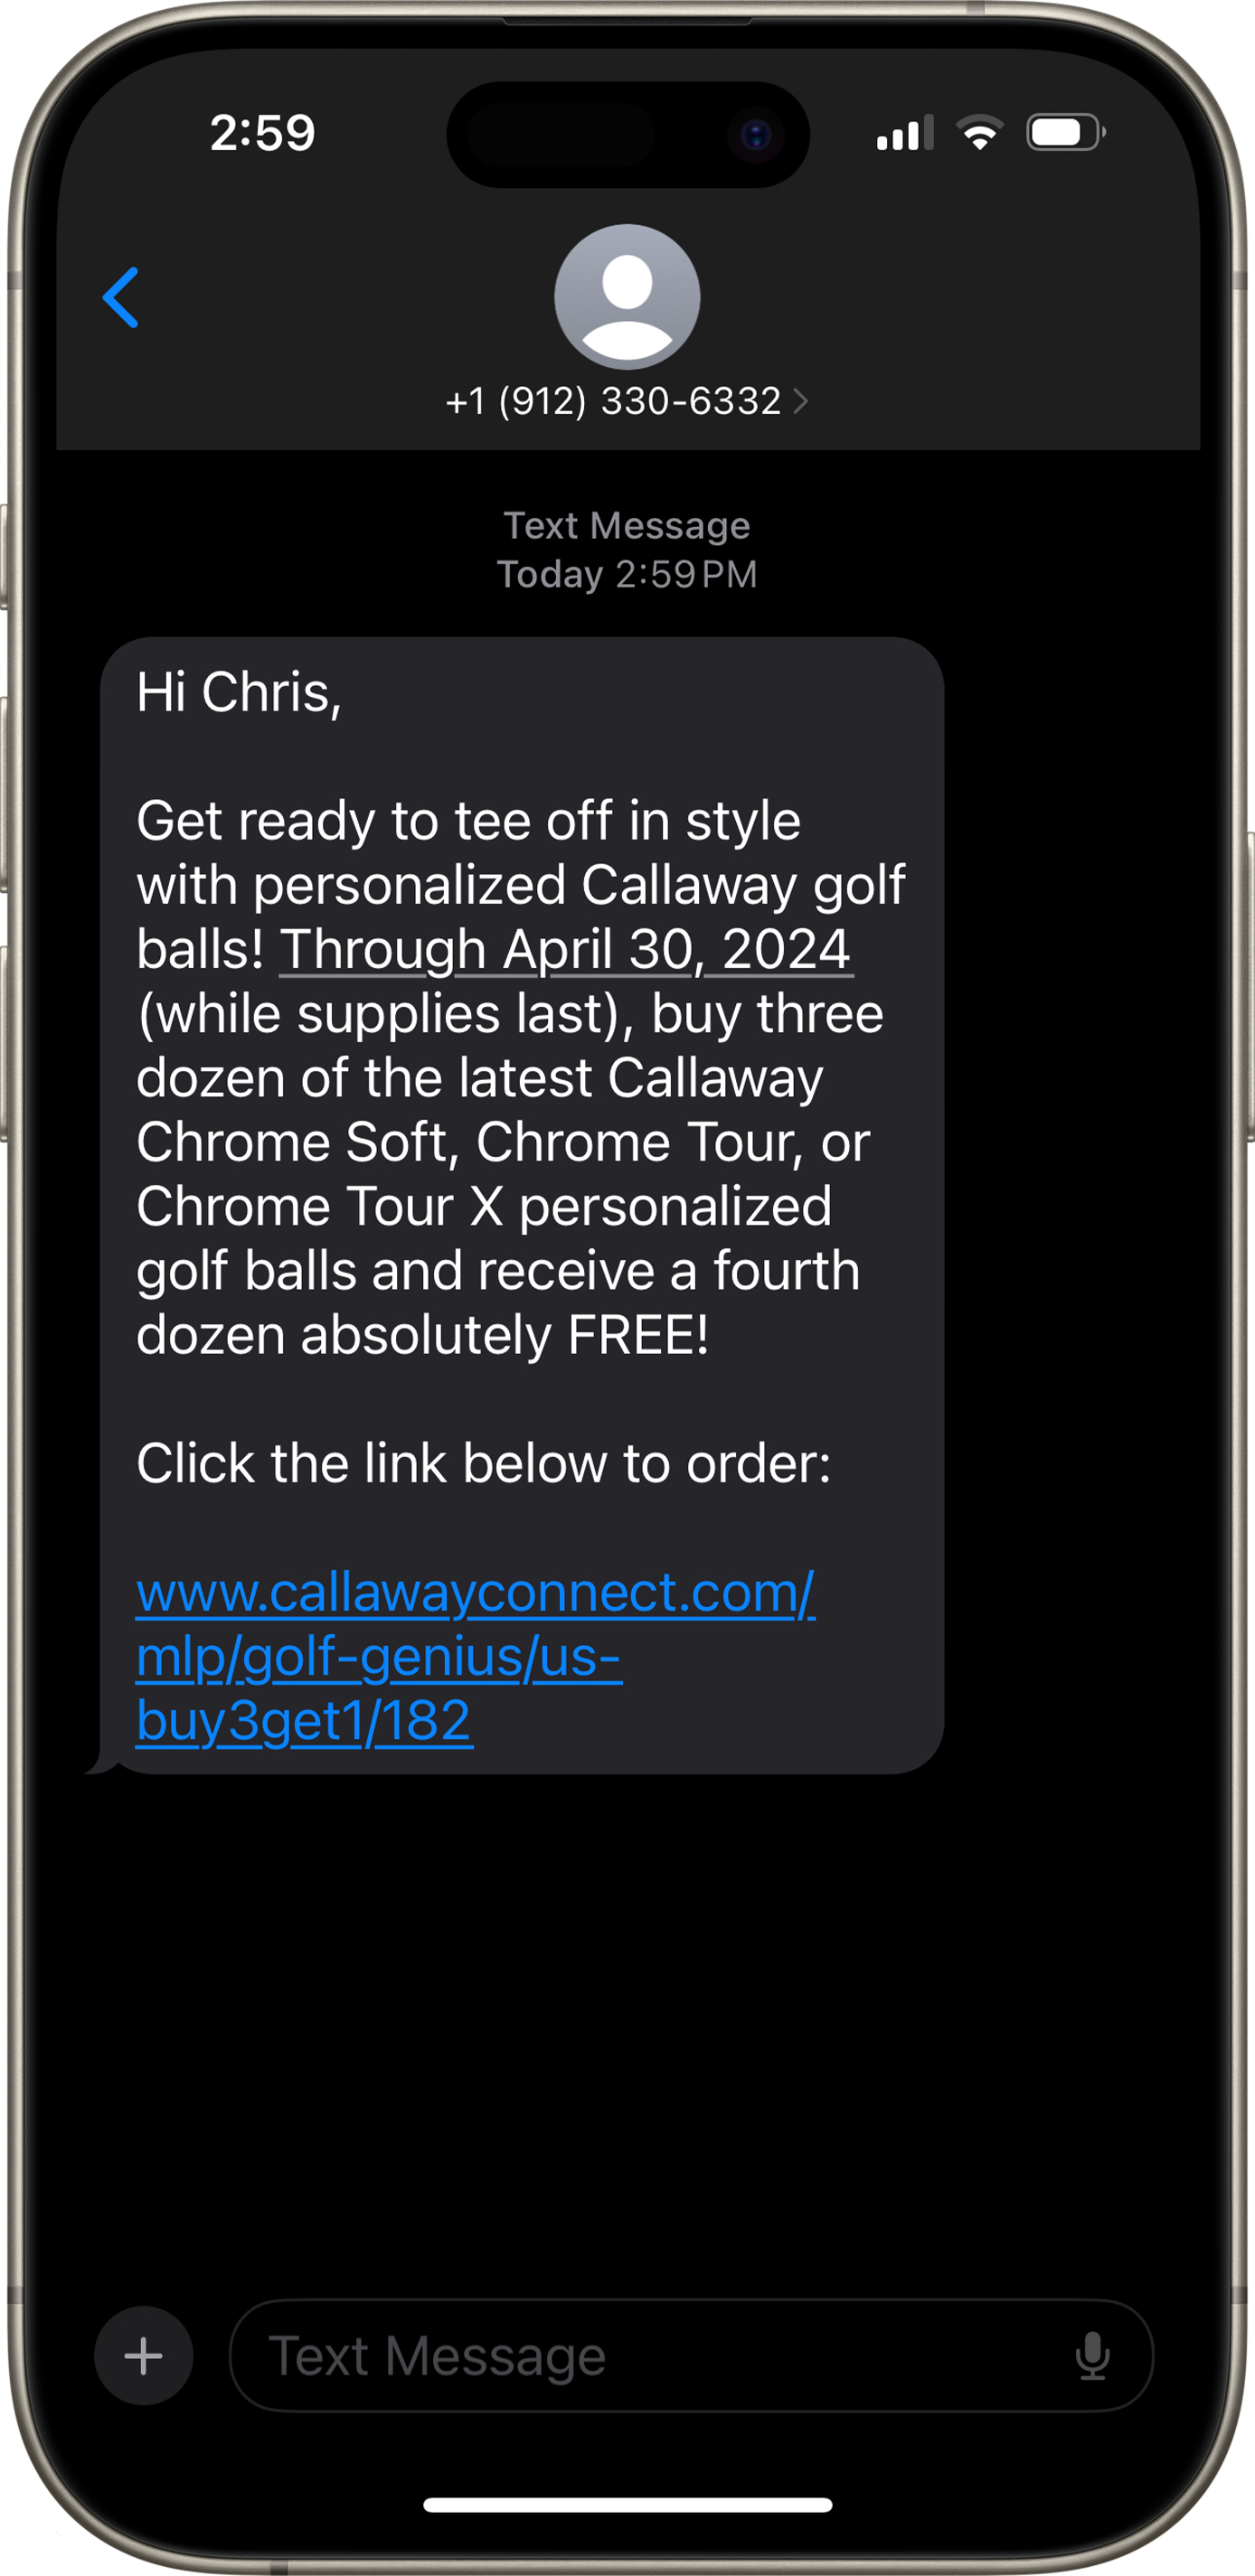
Below is an example text message being sent to a member.
Generic Link:
To share the promotion using a generic link, follow these instructions:
Go to Orders > Promotions.
Click "Copy" for the promotion you wish to share via a generic link.
Paste the link to any media you wish to share it by.
Viewing and Placing Order Request with Callaway:
With the promotion from Callaway, you must verify orders in Callaway Connect before they are placed. To review order requests, follow these directions:
Login to Callaway Connect.
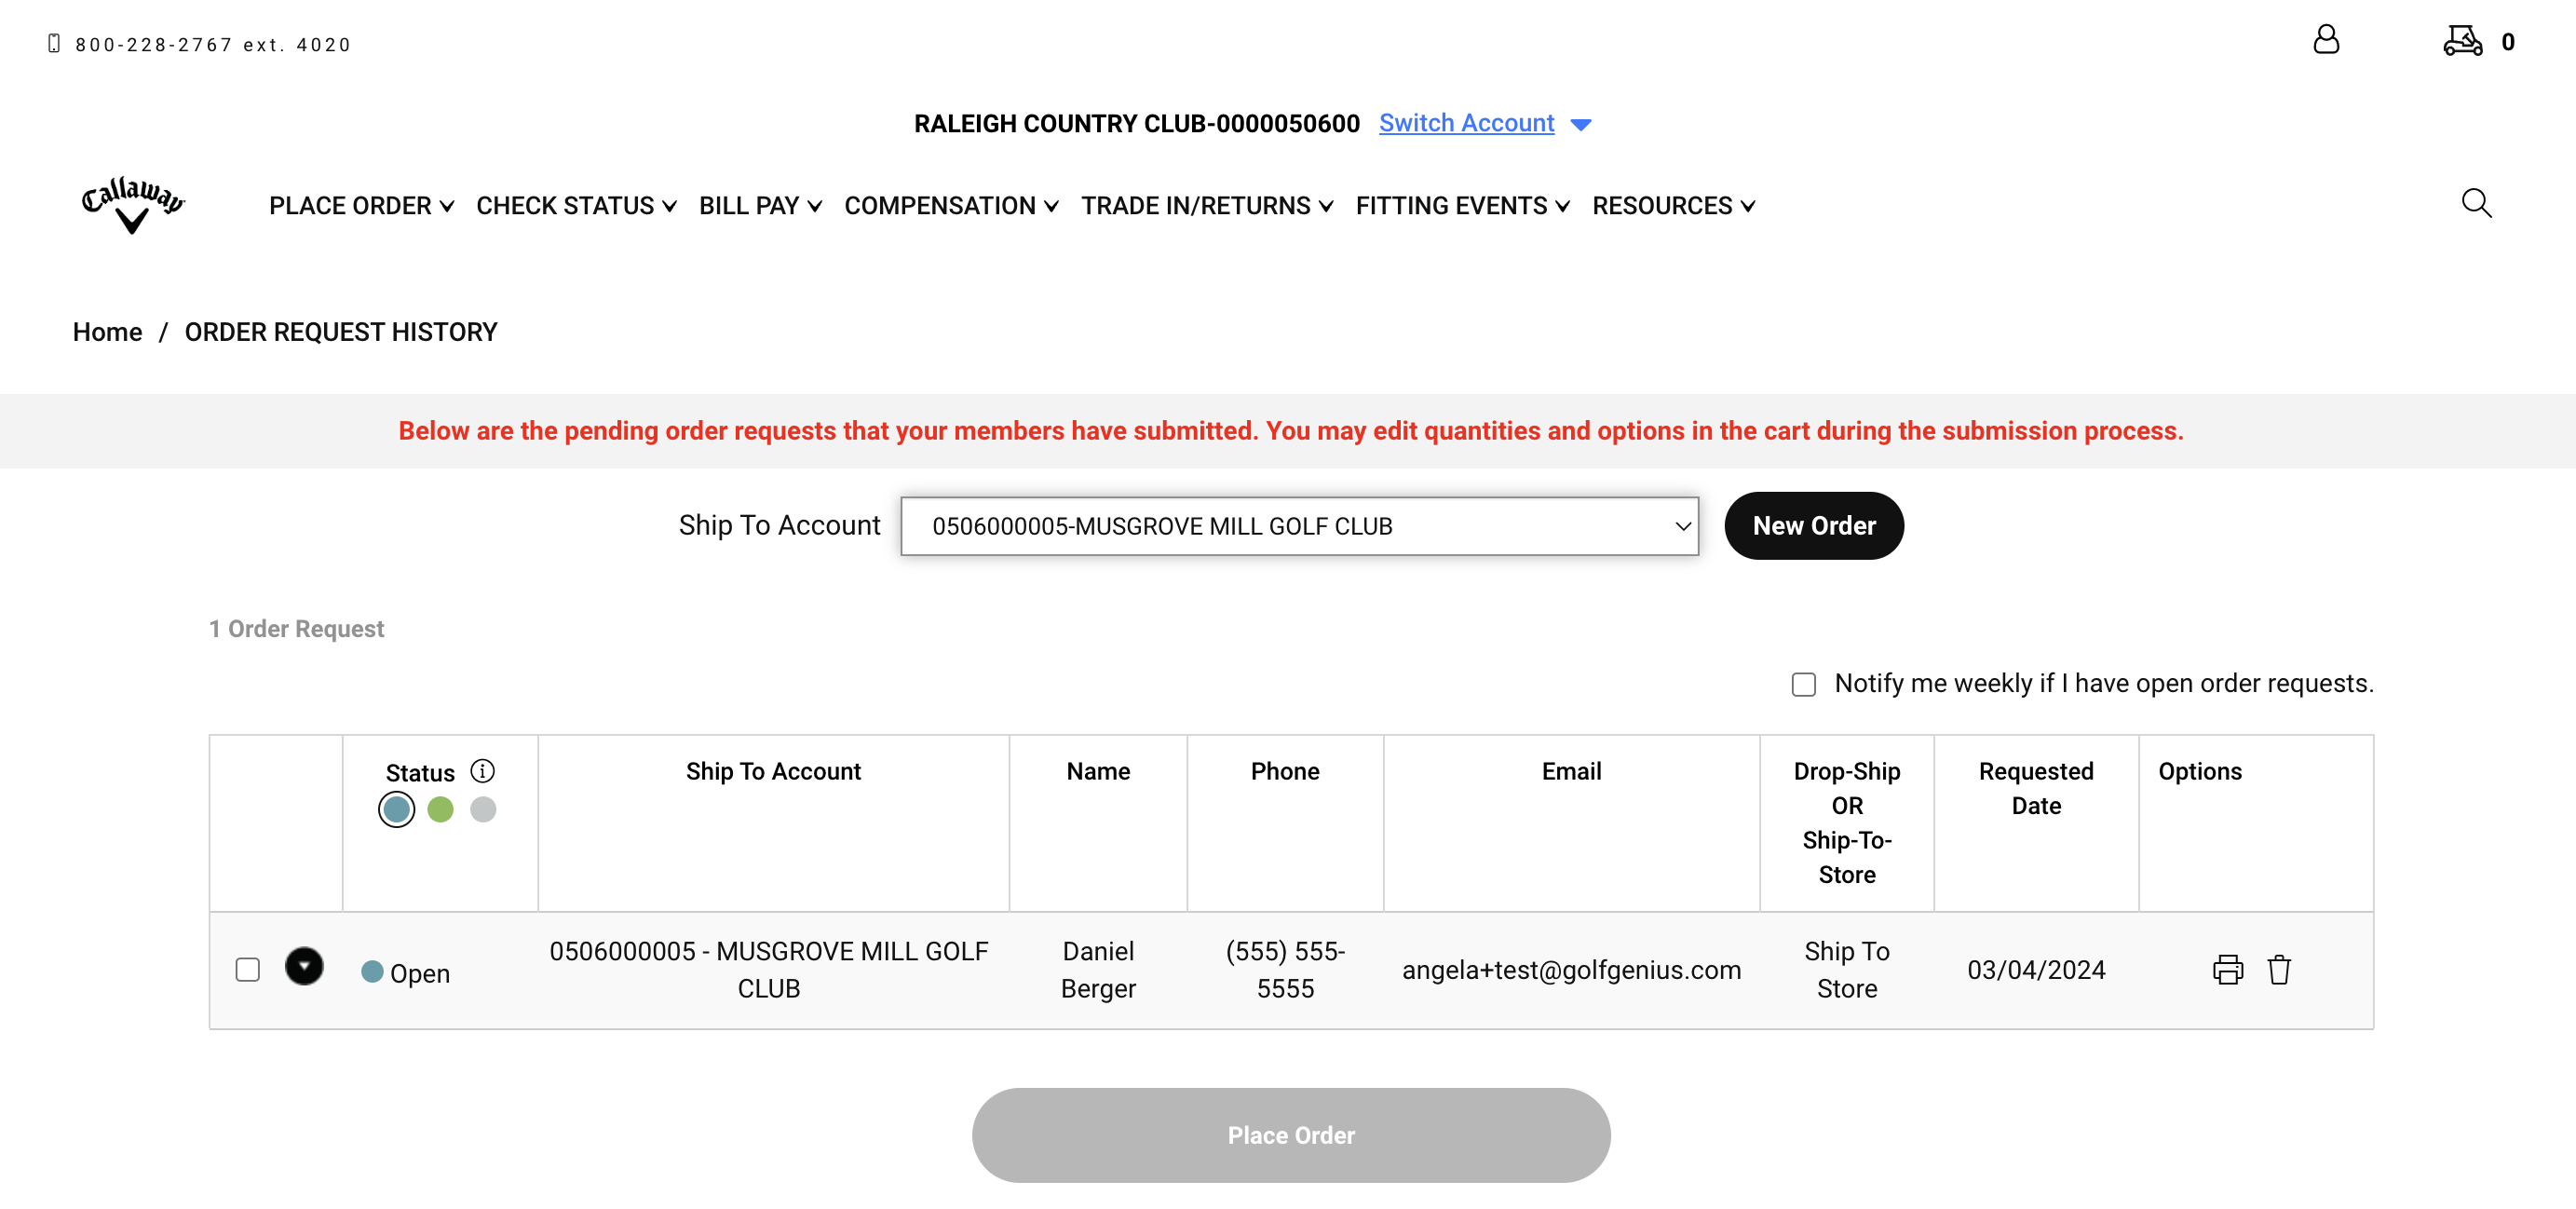
Access the member order request by clicking the Profile Icon > Promotions (as shown below).

Review and approve your member order request using one of the following options:
Create one Sales Order with Multiple Member Orders: Once approved, select the checkbox for each order request and select “PLACE ORDER.” This will convert the member’s order requests into an actual order (each member’s order request will be on a separate line item of the same order).
Create Separate Sales Orders for each Member Order: Select each request individually and click “PLACE ORDER” to generate separate orders. Note: Drop ship orders will need to be entered as separate orders.
After selecting the order(s) you wish to place, Click "Place Order."
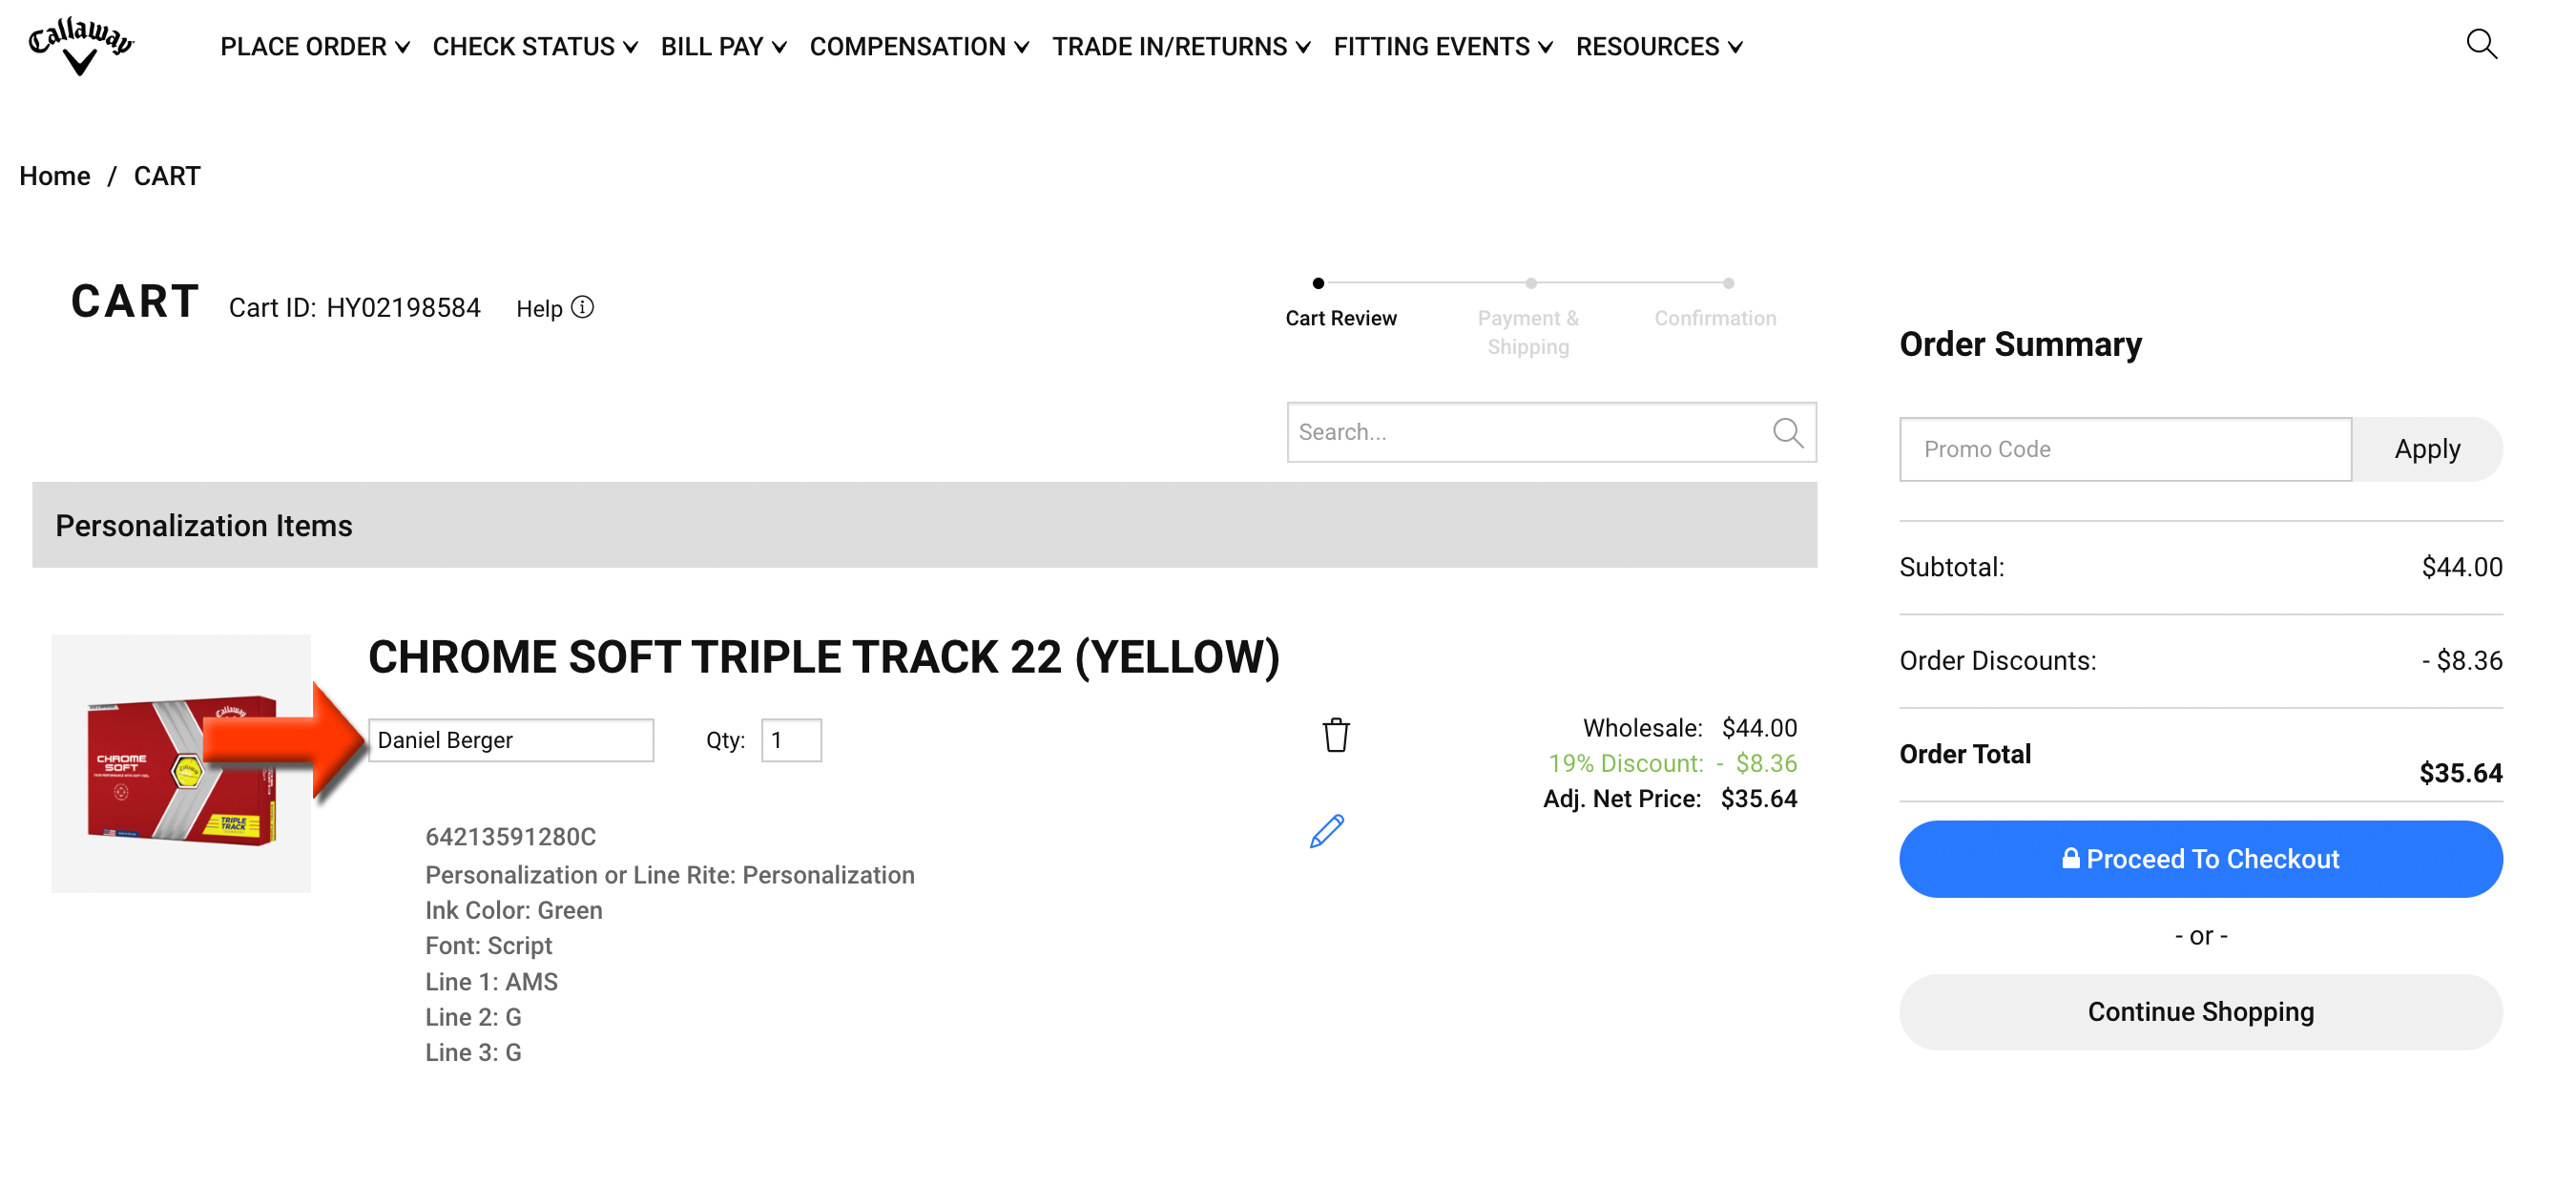
Each personalized item "Tag Name" will automatically be populated for each order (as shown below). Notes:
When a member's name or member number is entered in this field, Golf Shop will attempt to assign the member to the special order automatically.
If a member's name or number is not entered in this field, you can manually assign the member to the special order in Golf Shop.

After reviewing the cart, click "Proceed to Checkout."
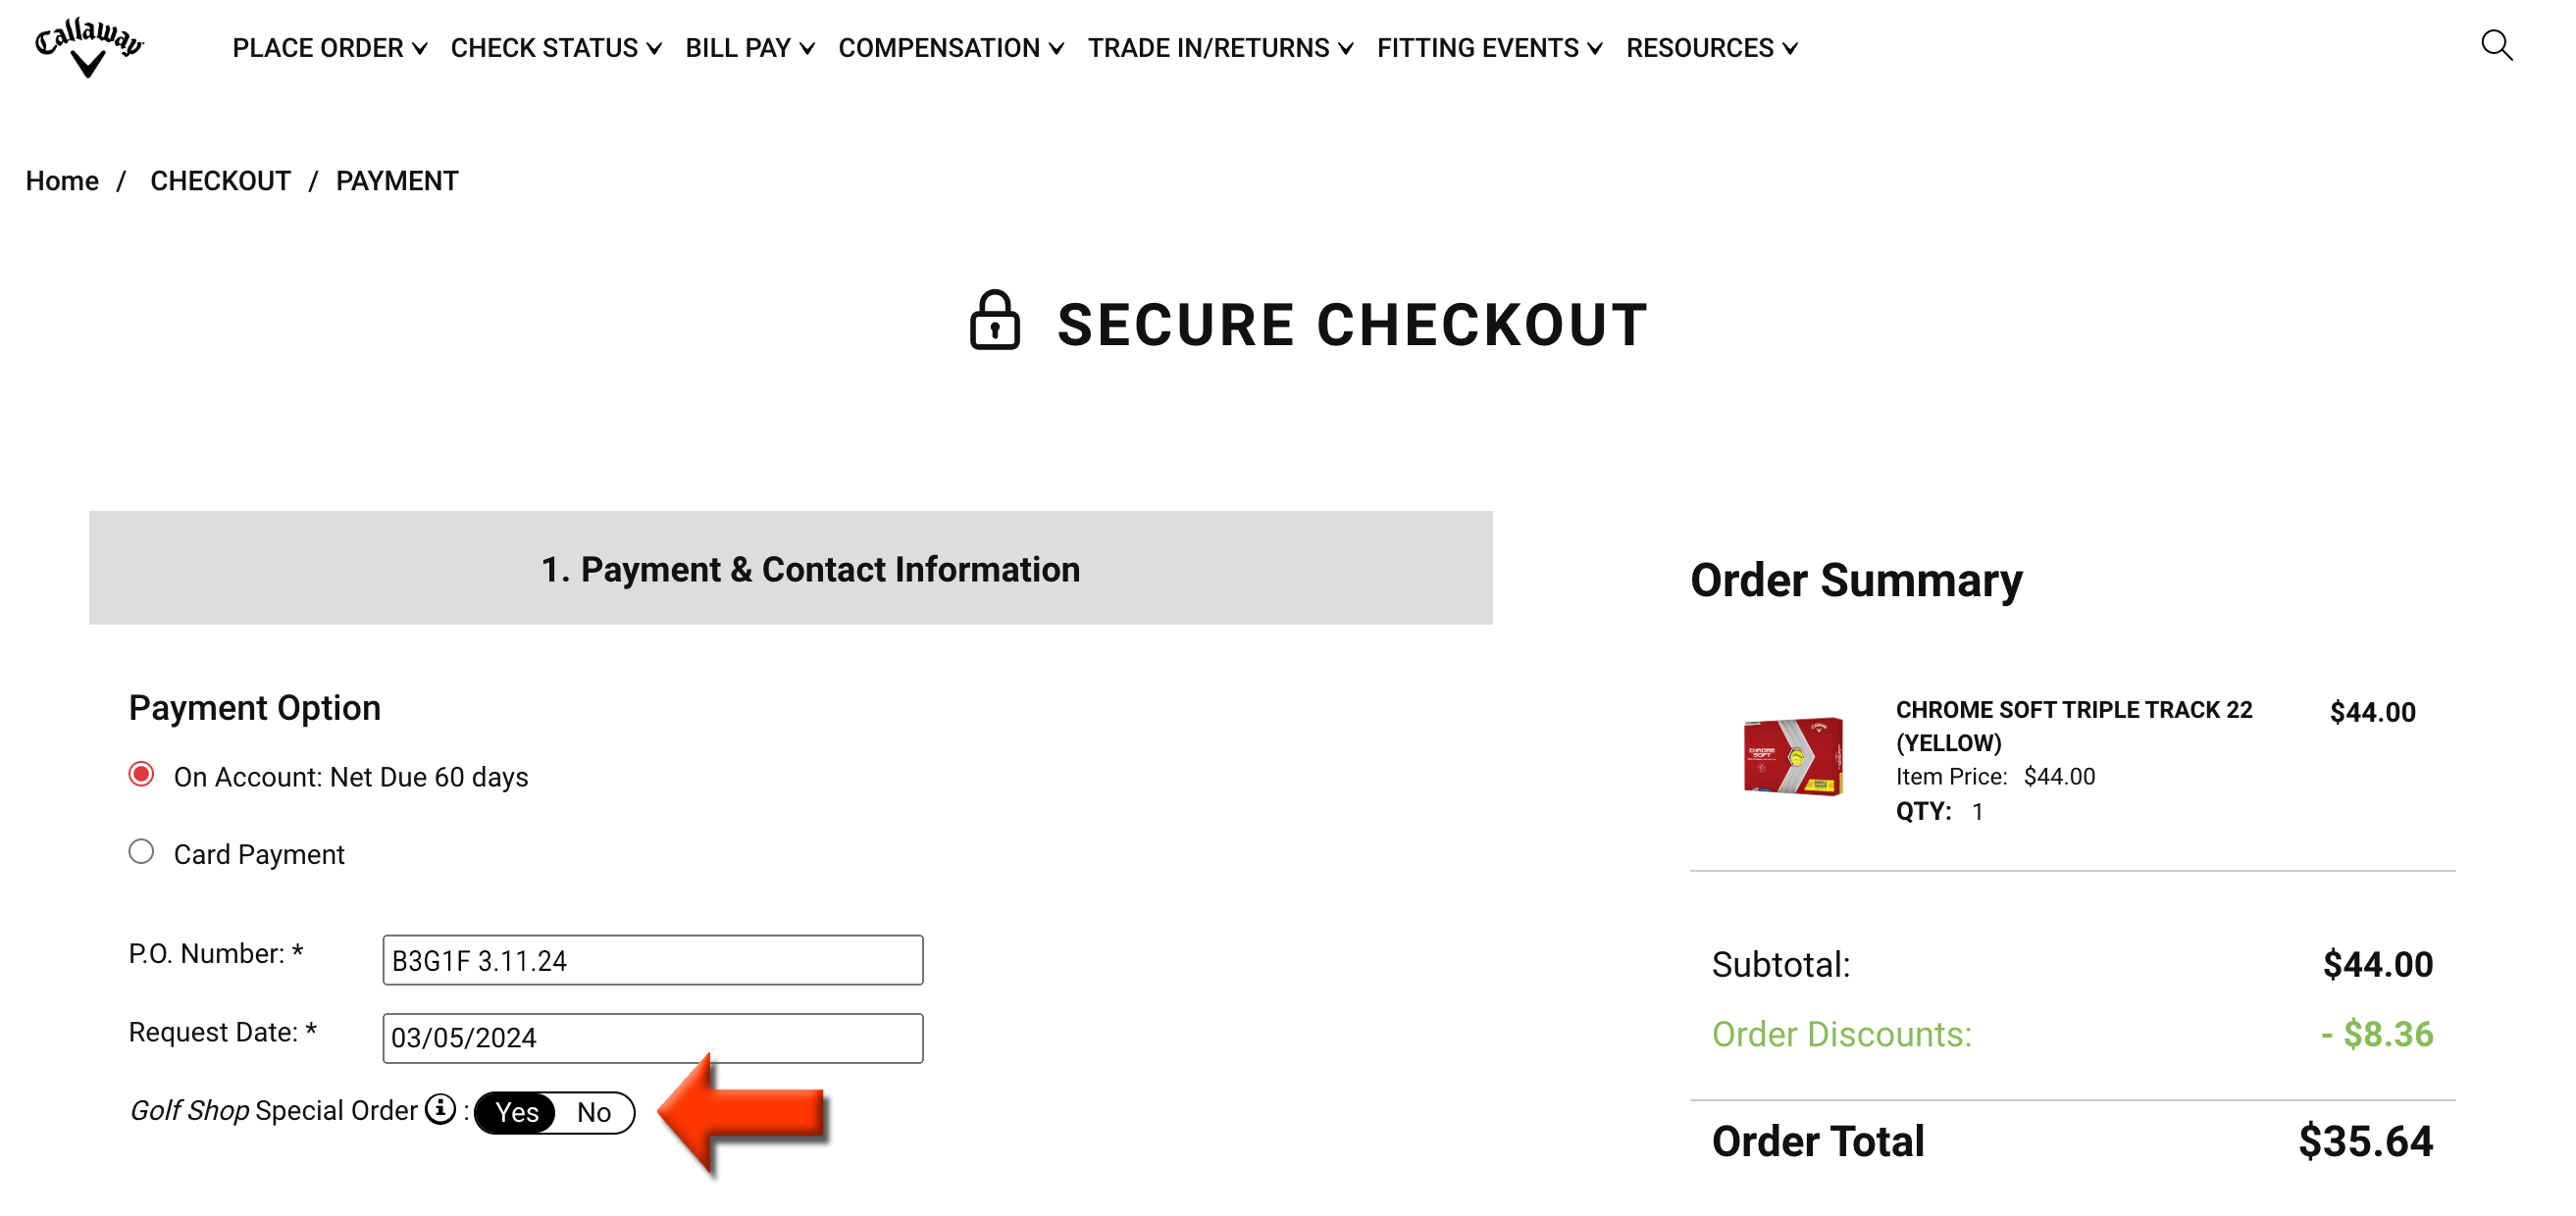
When in checkout, enter or select the following:
P.O. Number: Enter the P.O. Number for the order. This number will also be utilized at the P.O. Number of Golf Shop.
Golf Shop Special Order: Toggle the option "Golf Shop Special Order" to "Yes" (as shown below). Note: This toggle must be "Yes" for orders to filter to Golf Shop.

Click "Next" to complete your order in Callaway Connect.
After submitting the order in Callaway Connect and confirmed by Callaway, the order will be created in Golf Shop and placed in the "Orders Placed" stage with the flag "Callaway Connect" (as shown below). Notes:
This process can take several minutes.
Golf Shop will attempt to assign the member to the special order via the Callaway Connect Tag.
If a Tag name was not assigned to a special order, you must assign a customer to the order in Golf Shop.

If a member has not been assigned to the order, click "Assign Customer" to add a member or guest (if one has not already been assigned). Note: If a member was not assigned or Golf Shop could not assign one, a selected manager will receive an email notification that a member was not assigned to the special order. For more details on assigning which manager should receive this notification, Click Here.
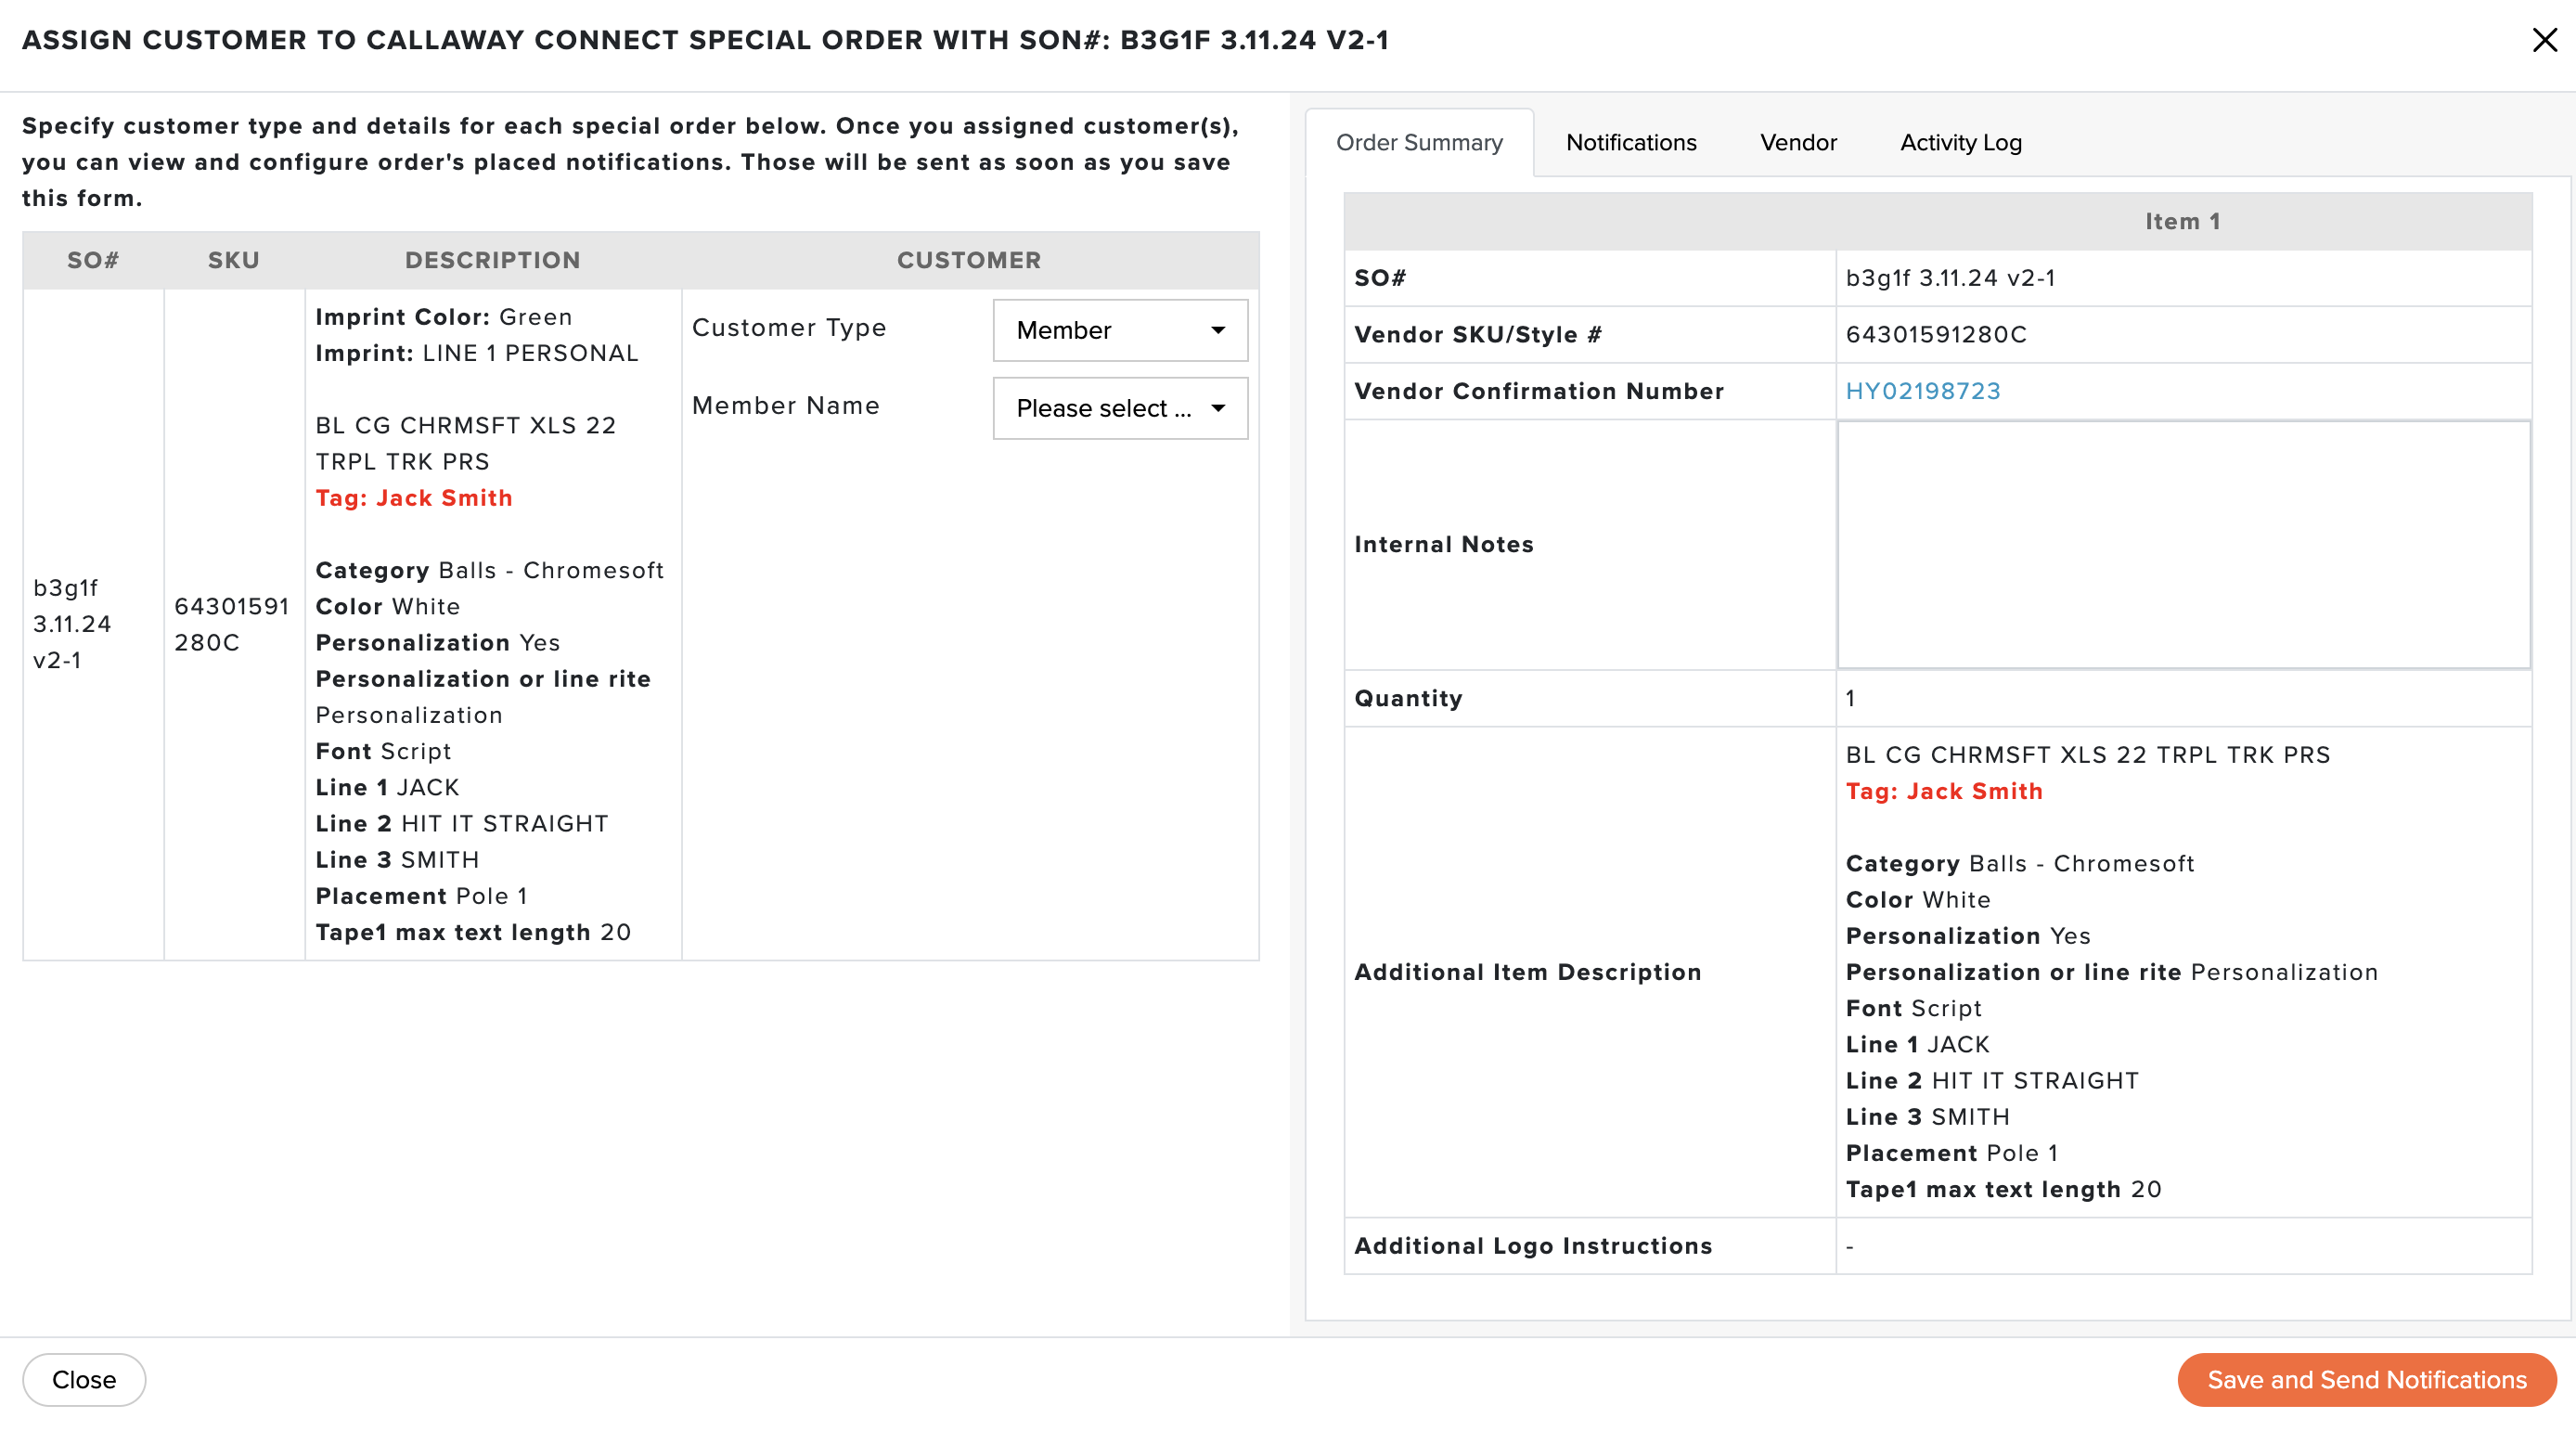
When assigning a customer, select the following (as shown below):

Customer Type: Select between:
Member: When selecting a member, choose a member from the "Member Name" dropdown.
Guest: When selecting Guest, fill in the additional details:
Guest First Name
Guest Last Name
Guest Email
Guest Cell Phone
Turn on or off the customer's text message and email notification on the right-hand side if necessary.
Click "Save and Send Notification."
Multiple Item Order Placement:
If multiple items are included in the Callaway Connect Order, Golf Shop will automatically create a special order for each additional item using the same P.O. numbers. The Special Order numbers for the additional items will be generated as usual (e.g., 1234-1, 1234-2, etc.).
When assigning a customer with multiple special orders, you can assign customers to each special order individually or assign customer(s) to all the special orders on one page.
To assign customer(s) to all the unassigned special orders in one P.O., click "Assign Customer" at the bottom of the P.O. block containing multiple special orders (as shown below).
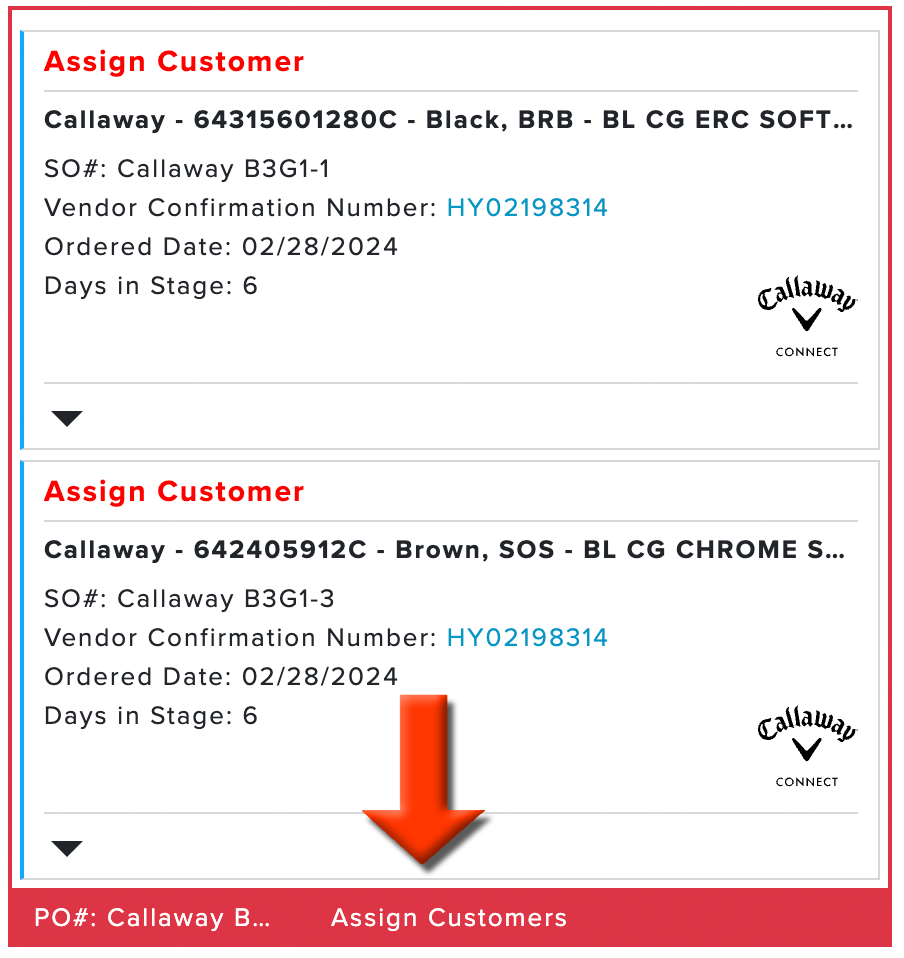
To individually assign each special order within a multi-item P.O., click "Assign Customer" within the Special Order block (as shown below).

Automatic Updates for Orders in the "Orders Placed" Stage:
Callaway Connect can provide additional information, allowing automatic order updates.
Expected Ship Date: When an expected ship date is available with the shipping information from Callaway Connect, the expected ship date will populate in the respective Golf Shop special orders.
Shipping Information: When shipping information is entered into Callaway Connect, the carrier and tracking number will populate in the respective Golf Shop special orders, triggering member notifications (if enabled). Further, if the automatic order transition option is enabled for shipping updates in your Special Order General Settings, the order will automatically move from the "Orders Placed" stage to the "Delivered" stage once it arrives at its destination. When the order moves between stages, the customer will receive an email notification (if enabled) and text message notification (if enabled) confirming that their order has been delivered.